Week 1: Introduction
Learning Goals
CONTENTS:
Readings
Please note the advised readings of “Brief C++ Late Objects” - Cay Horstmann:
- Monday: Familiarize yourself with Canvas, read the “Start Here” page, the “Syllabus”, and the VSCode Installation Guide
- Wednesday: 1.2, 1.3, 1.4
- Friday: 2.1, 2.2, 2.3
You might also find the videos in this YouTube playlist helpful to guide your learning this week.
Background
This week will be an introduction to a variety of foundational material for computer science. You will need to learn how to navigate the required software, basic variables, user input, and algorithms/pseudocode.
Navigating Terminals
In Visual Studio Code, you can open an integrated terminal, which initially starts at the bottom of your workspace. But what is a terminal?
A terminal is an interface to your computer which allows you to execute any task on the computer directly through commands, without the use of a graphical user interface or GUI (like the file explorers on your system that you use to navigate to folders, create files etc). This allows you to directly execute tasks, which is often quicker than using the GUI.
VS Code has a built in terminal that you can open and use to interact with your computer’s files and any code you write. To access this terminal, you will need to open VS Code. It may look like this the first time you open it:
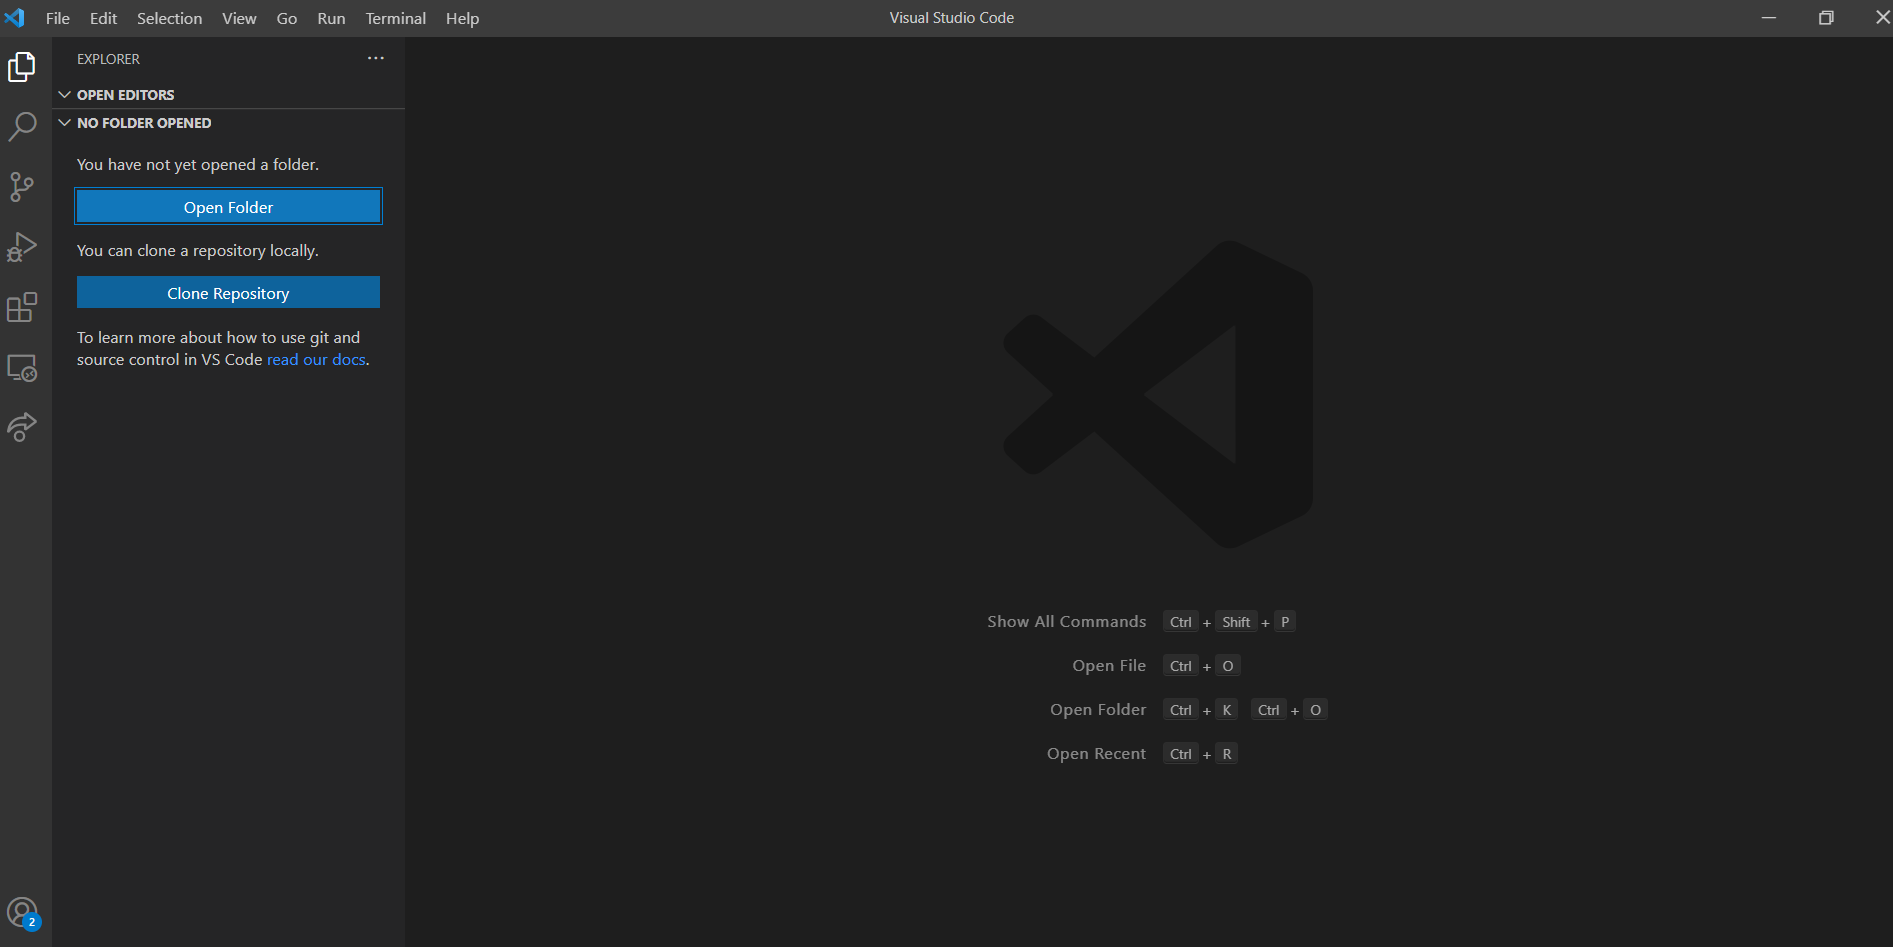
If you have not opened any folders yet in VS Code, you will need to start by opening one. You can do this by clicking “Open Folder” and navigating to whichever folder you would like to use. I would encourage you to make a new folder called “CSCI_1300” to keep all of your course materials organized.
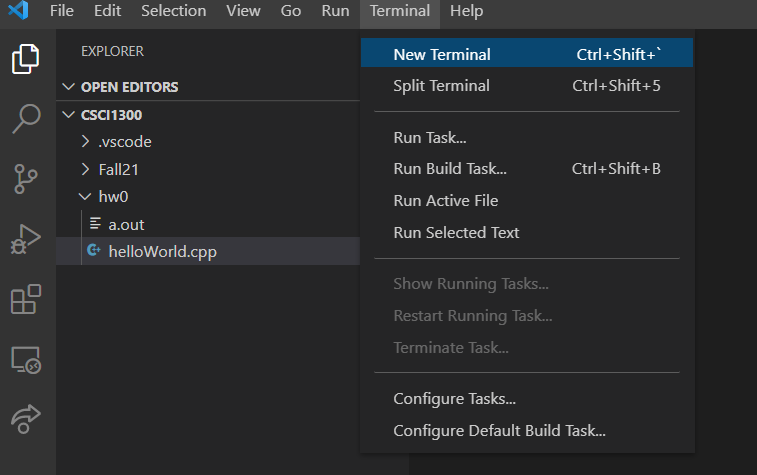
Once you have a folder open, you can open a terminal. To open the Terminal tab, go to the menu bar, locate Terminal and click on it. Select ``New Terminal” to open a new terminal. A terminal looks like a dark screen when you open it and will open below the main window.
The new screen should look something like this:
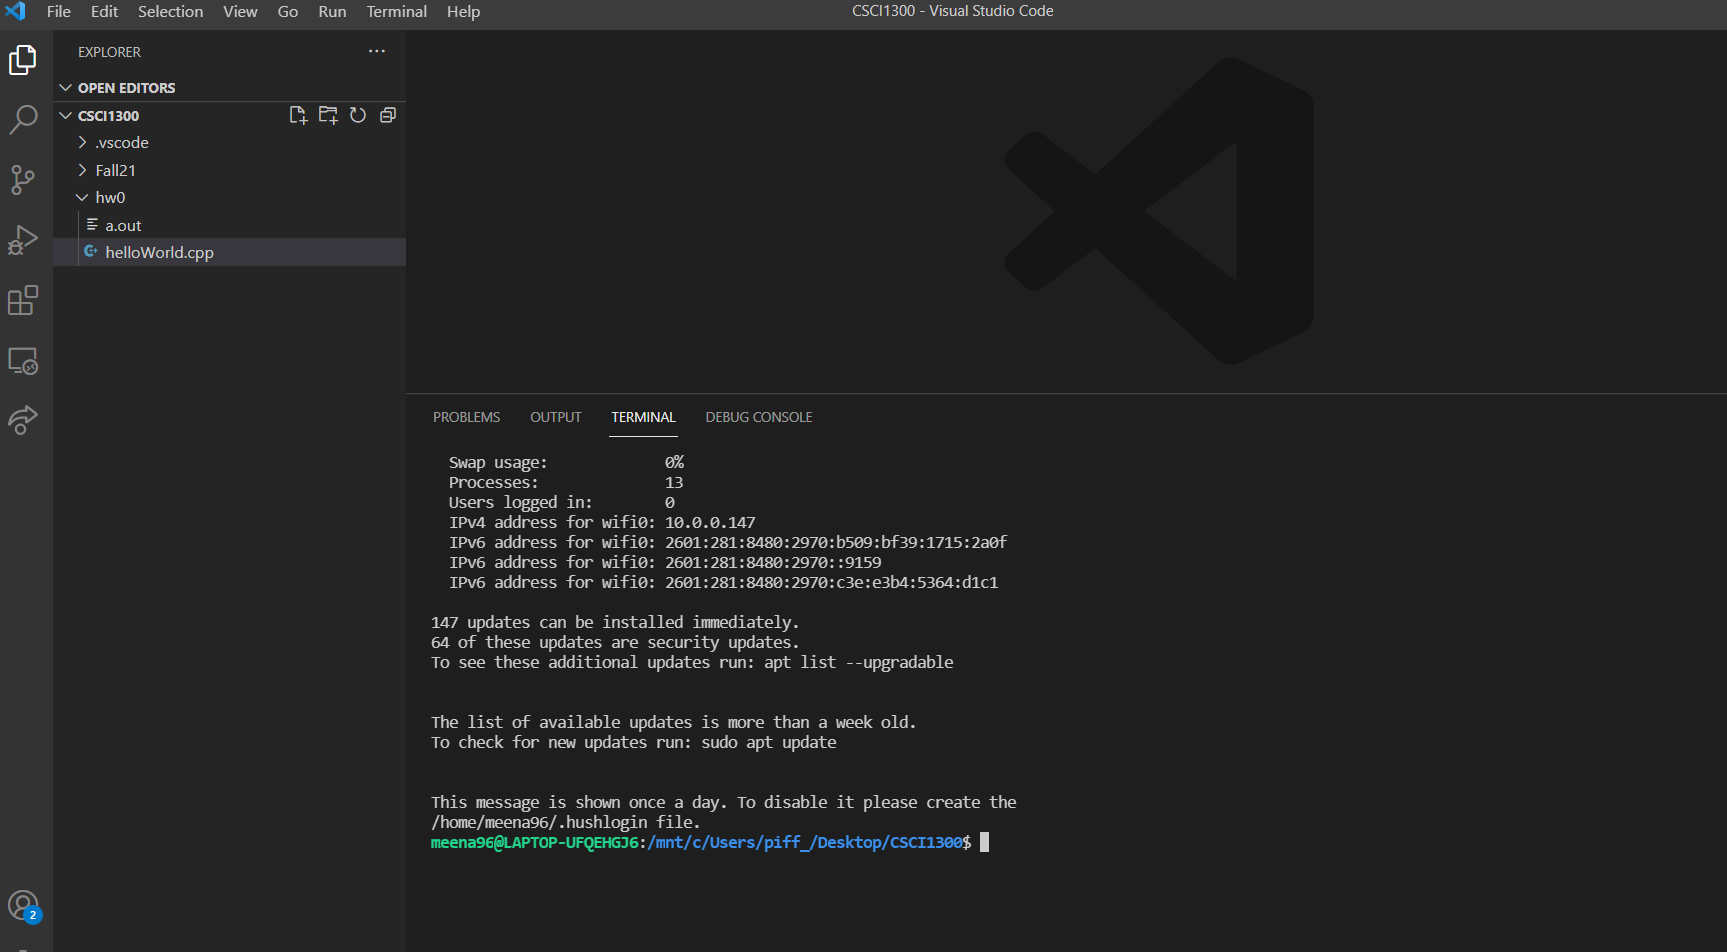
You will see your name and your device name on the terminal tab. Note that this can look different depending on your OS. The general anatomy of a terminal window is as follows:
- Everything before the
:tells you the username and the device name you’re logged in - Everything between the
:and$is your current directory (think of a directory as the folder you’re in). Note that you do not need to be in the same directory as the screenshots shown above. Yours will depend on your computer. Mac/Linux and Windows will look different, but both will state the current directory (or “folder”) that you are in. $represents the end of the prompt, after which you can enter a command.
File browsing using the terminal is like using Windows explorer/Finder or clicking on folders and navigating to different folders on your machine.
In the terminal, instead of clicking on folders we use text commands to tell the computer what we want. If we want to go to a folder where we saved our last homework, we can type the commands to navigate to that folder and display its contents.
You can read file and folder locations by their “pathname”, which is just a list of directories needed to get to your current location. Note: “folder” and “directory” mean the same thing, but most computer science texts will use the word “directory”. There are two different ways of expressing pathnames that you will come across; one is a constant pathname, which describes how to access a location from anywhere. A second one is a relative path name, which tells you how to get to a location from your current location. If you are already in a folder. You may see these pathnames have something like .., which tells the computer to go back a directory from the current location, but otherwise the style of these pathnames will look similar.
You will need to learn the basic text commands to navigate your computer system using the terminal. Important commands to learn include how to change which folder you are in, how to see the contents of your current folder, and more. Here is a list of commands and their meanings. Note, the <psudo> notation using < and > are not part of the command but only to illustrate where you should insert some other text:
command Linux/Mac |
command Windows |
name | notes |
|---|---|---|---|
ls |
dir |
list | Note, this a lowercase l(elle), not an uppercase i(eye). This will “list” everything in the current directory. |
cd <location> |
cd <location> OR chdir <location> |
change directory | move to the specified [location]. the location must be a director also known as a folder. |
mkdir <name> |
md <name> |
make directory | make a new directory at your current location using the provided <name> |
cp <from here> <to here> |
copy <from here> <to here> |
copy | locate a file <from here> and make a copy of it <to here>, commonly noted cp <src> <dst> or cp <source> <destination>. |
mv <from here> <to here> |
move <from here> <to here> |
move | locate a file <from here> and move that file <to here> do not maintain the file in <from here>, commonly noted mv <src> <dst> or mv <source> <destination>. |
zip <zip file> <listed files> |
tar -cvzf <zip file> <listed files> |
zip | gather all of the <listed files> and compress them to new “zip” file called <zip file>. |
rm <file name> |
del <file name> |
remove | permanently delete the file called <file name>. Be very careful when using this. It cannot be reversed. |
DISCLAIMER: Jan 17, 2025 the above table was updated with Windows commands, these have not been confirmed as working. They are authored by a “mac user” using google search. If it looks wrong please let us know on EdStem ASAP.
Compiling Code
Finally, you will need to know how to compile code from your terminal. Let us say that we have some code in a file called ``helloWorld.cpp”. In order to compile this program, we would have to navigate to the directory containing this file. Once there, you will enter the command:
g++ -std=c++17 helloWorld.cpp Let us understand the parts:
g++is the compiler program.-std=c++17is the version of C++ we want to use.helloWorld.cppis the file we wish to compile.
This command creates a file named a.out which is the compiled version of the code in helloWorld.cpp, which can be executed. You can run this compiled code using the following command:
./a.outAdditionally, you should begin compiling with flags that tell you more information about possible errors in your code. These flags include:
-Wall: Wall is short for “Warn All”, which will turn on most of the warnings in C++. This will help identify various possible ways your code might go wrong, including array bounds errors and other helpful messages.-Werror: Werror will treat all warnings as errors. This will prevent you from skipping past the possible sources of error in your code, and you will need to make sure all warnings are resolved prior to compiling.-Wpedantic: This flag enables warnings that alert you about language constructs that are not ISO C or ISO C++ standard compliant. This is particularly helpful to identify constructs that may not be uniform in other compilers, which could cause problems with your code on other machines. This will help prevent instances where your code works on your personal computer, but does not work on CodeRunner or on the grader’s computer.-Wsign-compare: This flag enables warnings that alert you about type issues which can occur that are machine dependent. This particular command is crutical for MacOS users to have builds that look like our autograding system.
All together, your command line prompt will look something like this:
g++ -Wall -Werror -Wpedantic -Wsign-compare -std=c++17 myCodeFile.cppPro Tips:
- Tab Complete: if you’re typing something in the command line that’s very long, but unique, you can hit tab when you’re partially through and it will try to fill in the rest (kind of like autocomplete). If it doesn’t, and you press tab twice, it tells you everything it has as options.
- Command history browsing: if you have typed a command and want to repeat it, just press the up arrow. It will bring up your last executed command. Pressing up again will go to the one before. Pressing down will go forward in time through the list.
Anatomy of a C++ Program
You will need a couple of components for the computer to be able to understand how to translate code that you can read into something it can actually do.
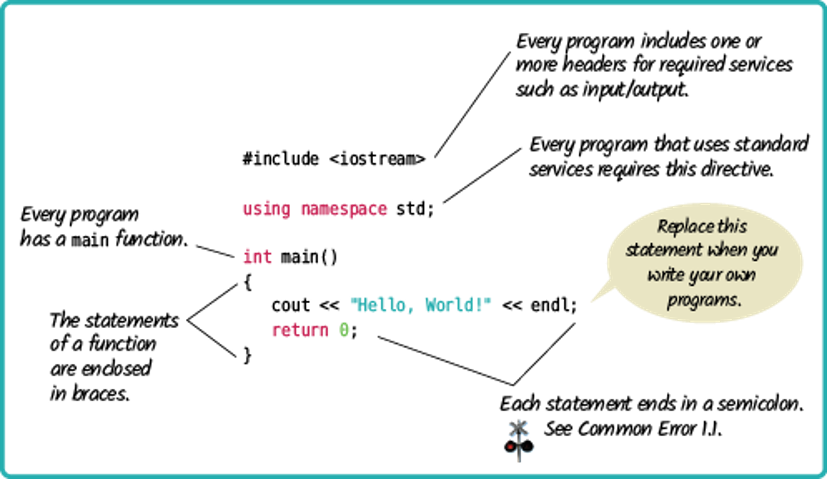
Here is a snapshot of a basic “Hello World” program from the course textbook, Brief C++: Late Objects, Enhanced eText.
Recitation: Software Setup
You will need to install and become familiar with the software we will be using this semester. Follow the appropriate installation guides in Appendix A for your particular computer (Windows or Mac) to install VS Code.
Once you have installed your software you will need to open VS Code and open the terminal. You will need VS Code and a working terminal. Take a screenshot and submit it on Canvas for this week’s Recitation assignment. Due Wednesday Jan 15, at midnight.
Homework: Hello World
The “Hello, World!” program is one of the simplest programs in a programming language, and it is often used to illustrate the basic syntax of a programming language. We will need to first create a folder to store our program file in and then create the file to write the program.
Step 1: Setup
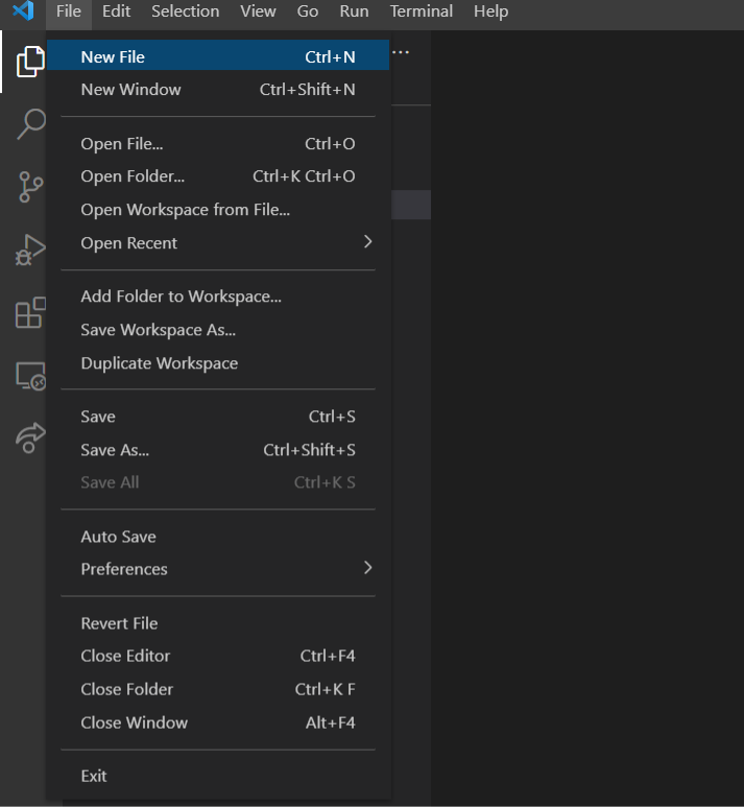
First, open VS Code. You can make a new folder by clicking this button:
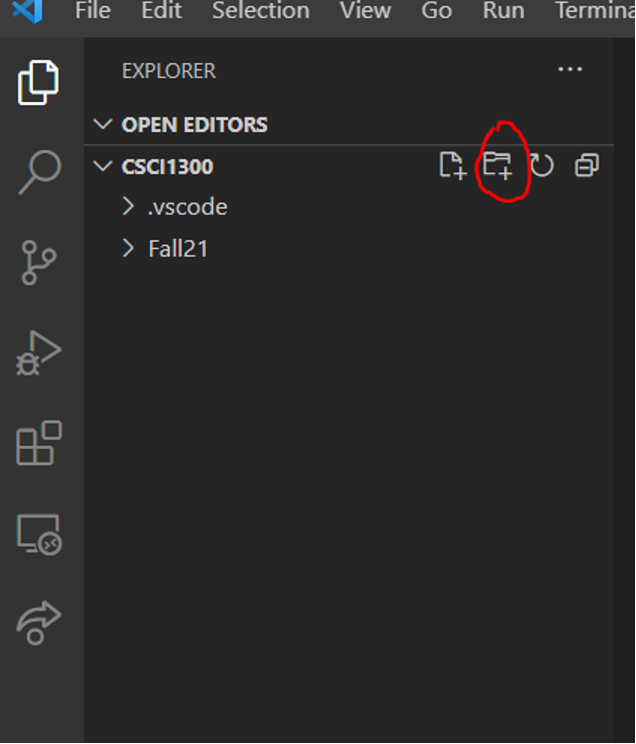
Name the folder something intuitive, like “Week_1”, “Recitation_1”, or similar. Once you have your folder you will need to create a file within it, which you can do with the toolbar across the top:
You should name your file helloWorld_1.cpp – this file name structure is important. Files of uncompiled C++ code should end with .cpp, and the usage of a capital letter at the beginning of each word makes it legible even without spaces or punctuation. This style of writing names is often called “camel case”. If you are interested there are other cases like PascalCase, snake_case, and SCREAMING_SNAKE_CASE, reach out on EdStem to dicsuss this further if you’re interested.
Step 2: Your First Program
Type the following code into your file:
#include <iostream>

int main() {
    std::cout << "Hello, world!" << std::endl;
}
Save your file. A quick shortcut to save is Cmd + S (In Mac) or Ctrl + S (in Windows). Now you will need to compile and run your program. You can review the background information on “Compiling Code” to see how to do this.
Step 3: helloWorld_1.<png,jpeg, other image type>
Once you have successfully run your program, take a screenshot of your VS Code window including both the source code file and the terminal that shows your build commands and a successful run of the program. Name this photo helloWorld_1.<png,jpeg, other image type> using whatever type is defaulted for your screenshot system.
Step 4: Hello World: Improved
Now, create a new file helloWorld_2.cpp.
Let us explore this program a little more. Add a statement to use the standard namespace. Insert using namespace std; at the beginning of the code, then we can remove the std:: prefixes. Your new code should look like this:
#include <iostream>

using namespace std;

int main() {
    cout << "Hello, world!" << endl;
}
Build and execute the new program.
Step 5: helloWorld_2.<png,jpeg, other image type>
Once you have successfully run your program, take a screenshot of your VS Code window including both the source code file and the terminal that shows your build commands and a successful run of the program. Name this photo helloWorld_2.<png,jpeg, other image type> using whatever type is defaulted for your screenshot system.
Step 6: Hello CSCI 1300!
Now, create a new file helloWorld_3.cpp.
Let’s modify the file from above to print “Hello world! Hello CSCI 1300”. The text inside of the quotation marks is printed as it is. It’s case sensitive too! To see the updated output, compile and run again.
#include <iostream>

using namespace std;

int main() {
    cout << "Hello, world!";
    cout << " Hello CSCI 1300" << endl;
}
Ask yourself, why is it that this program prints on one line even though it is coded as two lines of printing.
Step 7: helloWorld_3.<png,jpeg, other image type>
Once again, take a screenshot, and name it helloWorld_3.<png,jpeg, other image type>.
Step 8: zip the files
For this section you should have three screenshots with names like helloWorld_1.jpeg, helloWorld_2.jpeg, helloWorld_3.jpeg. You should also have three separate code files named helloWorld_1.cpp, helloWorld_2.cpp, and helloWorld_3.cpp. Put all of these into a single directory/folder by whatever means necessary.
Create ONE “ZIP” file that contains both the three screenshots, and the three .cpp files you created, and submit it on Canvas. Recall that zip is detailed in the background section of this webpage.