Week 16: Final Exam Prep
By request we have copied all background sections of the course here. The final exam is cumulative, so all material covered this semester is fair game (including vectors, sorting, and recursion).
CONTENTS:
- Readings
- Week 1 Background
- Week 2 Background
- Week 3 Background
- Week 4 Background
- Week 5 Background
- Week 6 Background
- Week 7 Background
- Week 8 Background
- Week 9 Background
- Week 10 Background
- Week 11 Background
- Week 12 Background
- Week 13 Background
- Week 14 Background
- Week 15 Background
- Recitation Prequiz (N/A)
- Recitation: project presentations
Readings
Week 1 Background
Navigating Terminals
In Visual Studio Code, you can open an integrated terminal, which initially starts at the bottom of your workspace. But what is a terminal?
A terminal is an interface to your computer which allows you to execute any task on the computer directly through commands, without the use of a graphical user interface or GUI (like the file explorers on your system that you use to navigate to folders, create files etc). This allows you to directly execute tasks, which is often quicker than using the GUI.
VS Code has a built in terminal that you can open and use to interact with your computer’s files and any code you write. To access this terminal, you will need to open VS Code. It may look like this the first time you open it:
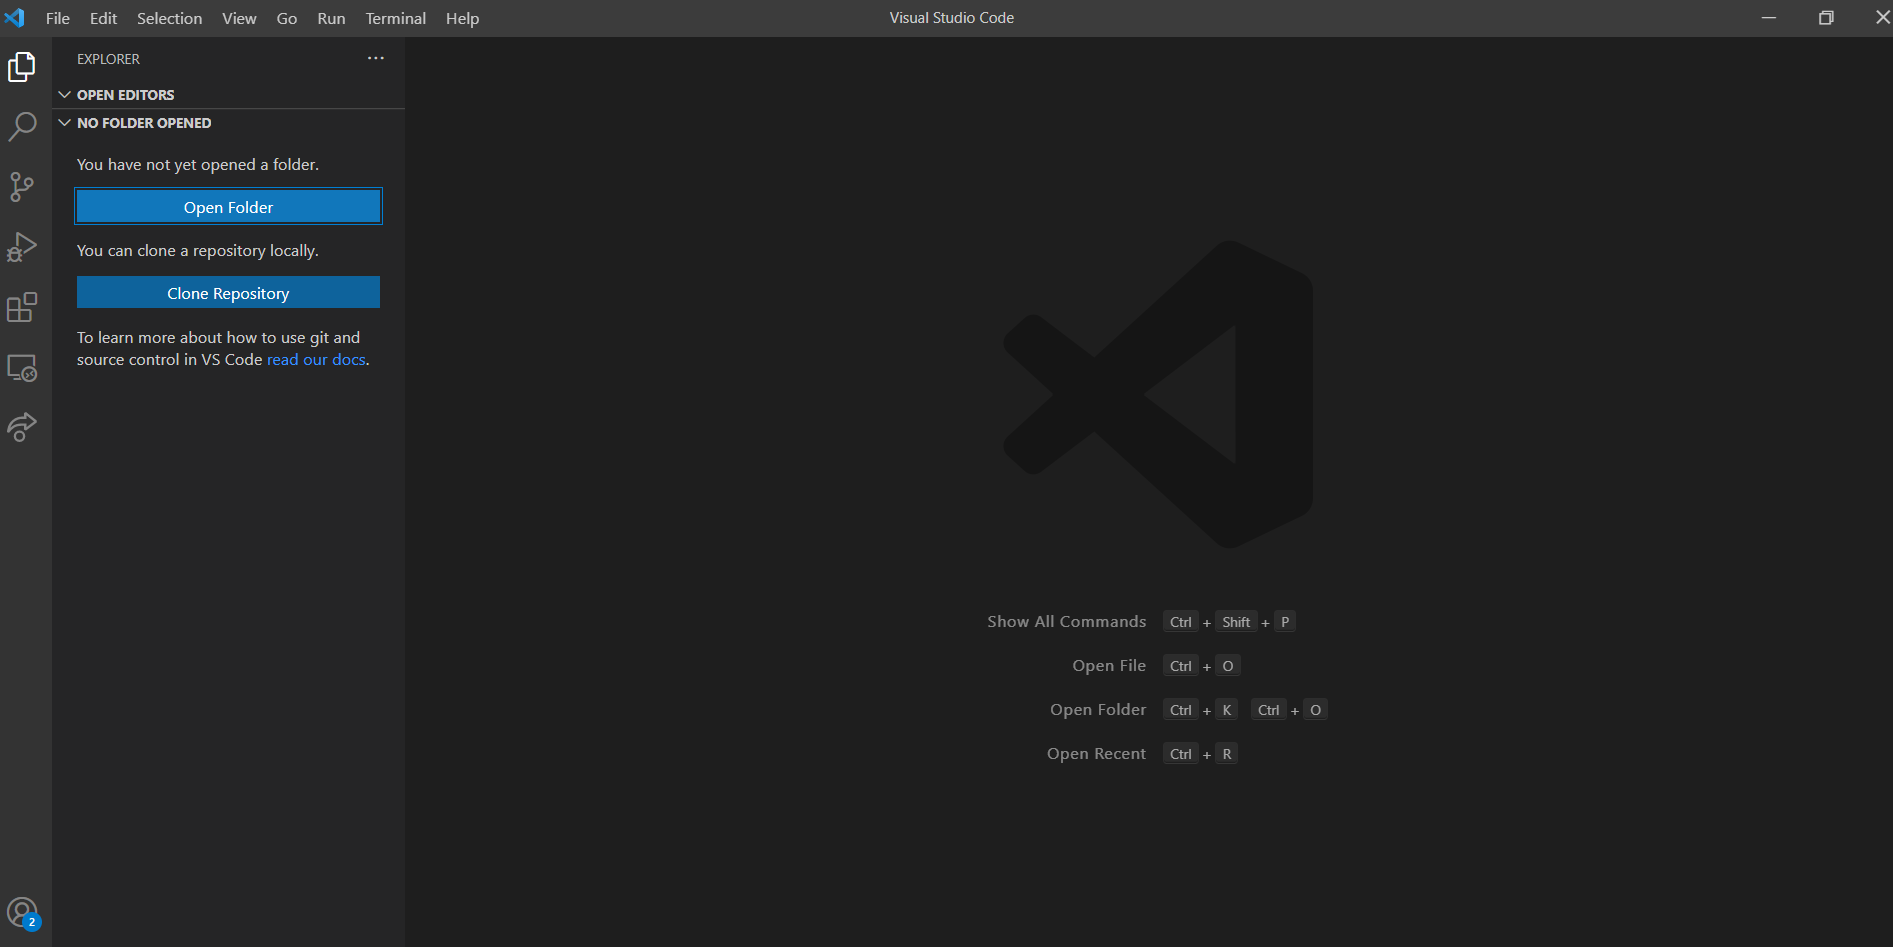
If you have not opened any folders yet in VS Code, you will need to start by opening one. You can do this by clicking “Open Folder” and navigating to whichever folder you would like to use. I would encourage you to make a new folder called “CSCI_1300” to keep all of your course materials organized.
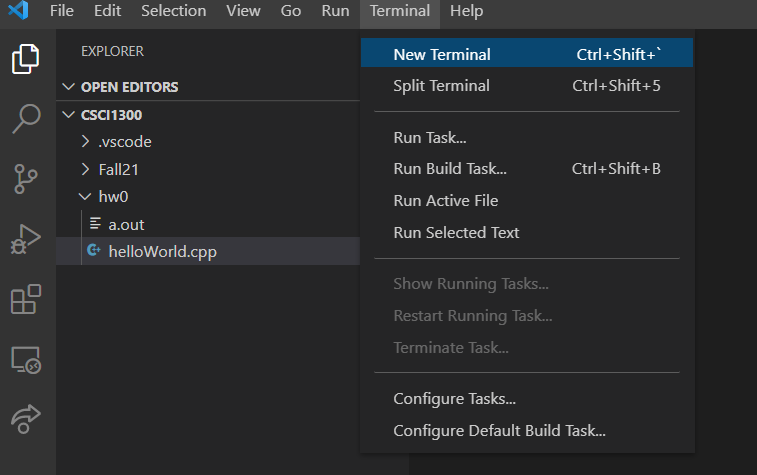
Once you have a folder open, you can open a terminal. To open the Terminal tab, go to the menu bar, locate Terminal and click on it. Select ``New Terminal” to open a new terminal. A terminal looks like a dark screen when you open it and will open below the main window.
The new screen should look something like this:
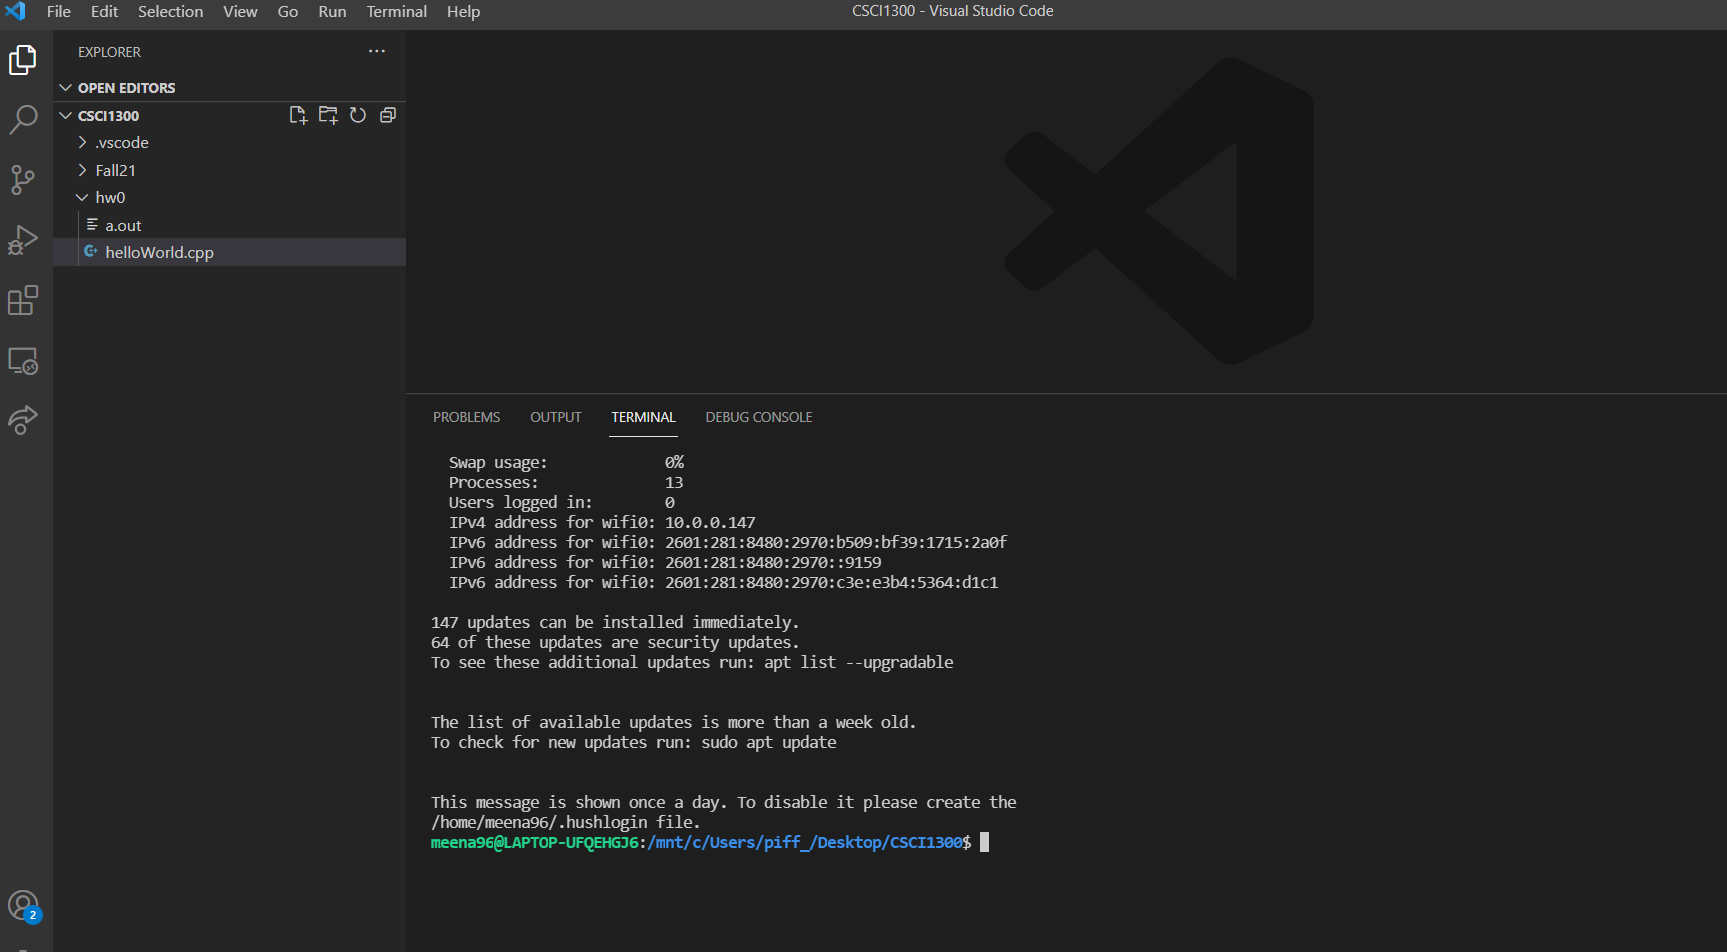
You will see your name and your device name on the terminal tab. Note that this can look different depending on your OS. The general anatomy of a terminal window is as follows:
- Everything before the
:tells you the username and the device name you’re logged in - Everything between the
:and$is your current directory (think of a directory as the folder you’re in). Note that you do not need to be in the same directory as the screenshots shown above. Yours will depend on your computer. Mac/Linux and Windows will look different, but both will state the current directory (or “folder”) that you are in. $represents the end of the prompt, after which you can enter a command.
File browsing using the terminal is like using Windows explorer/Finder or clicking on folders and navigating to different folders on your machine.
In the terminal, instead of clicking on folders we use text commands to tell the computer what we want. If we want to go to a folder where we saved our last homework, we can type the commands to navigate to that folder and display its contents.
You can read file and folder locations by their “pathname”, which is just a list of directories needed to get to your current location. Note: “folder” and “directory” mean the same thing, but most computer science texts will use the word “directory”. There are two different ways of expressing pathnames that you will come across; one is a constant pathname, which describes how to access a location from anywhere. A second one is a relative path name, which tells you how to get to a location from your current location. If you are already in a folder. You may see these pathnames have something like .., which tells the computer to go back a directory from the current location, but otherwise the style of these pathnames will look similar.
You will need to learn the basic text commands to navigate your computer system using the terminal. Important commands to learn include how to change which folder you are in, how to see the contents of your current folder, and more. Here is a list of commands and their meanings. Note, the <psudo> notation using < and > are not part of the command but only to illustrate where you should insert some other text:
command Linux/Mac |
command Windows |
name | notes |
|---|---|---|---|
ls |
dir |
list | Note, this a lowercase l(elle), not an uppercase i(eye). This will “list” everything in the current directory. |
cd <location> |
cd <location> OR chdir <location> |
change directory | move to the specified [location]. the location must be a director also known as a folder. |
mkdir <name> |
md <name> |
make directory | make a new directory at your current location using the provided <name> |
cp <from here> <to here> |
copy <from here> <to here> |
copy | locate a file <from here> and make a copy of it <to here>, commonly noted cp <src> <dst> or cp <source> <destination>. |
mv <from here> <to here> |
move <from here> <to here> |
move | locate a file <from here> and move that file <to here> do not maintain the file in <from here>, commonly noted mv <src> <dst> or mv <source> <destination>. |
zip <zip file> <listed files> |
tar -cvzf <zip file> <listed files> |
zip | gather all of the <listed files> and compress them to new “zip” file called <zip file>. |
rm <file name> |
del <file name> |
remove | permanently delete the file called <file name>. Be very careful when using this. It cannot be reversed. |
DISCLAIMER: Jan 17, 2025 the above table was updated with Windows commands, these have not been confirmed as working. They are authored by a “mac user” using google search. If it looks wrong please let us know on EdStem ASAP.
Compiling Code
Finally, you will need to know how to compile code from your terminal. Let us say that we have some code in a file called ``helloWorld.cpp”. In order to compile this program, we would have to navigate to the directory containing this file. Once there, you will enter the command:
g++ -std=c++17 helloWorld.cpp Let us understand the parts:
g++is the compiler program.-std=c++17is the version of C++ we want to use.helloWorld.cppis the file we wish to compile.
This command creates a file named a.out which is the compiled version of the code in helloWorld.cpp, which can be executed. You can run this compiled code using the following command:
./a.outAdditionally, you should begin compiling with flags that tell you more information about possible errors in your code. These flags include:
-Wall: Wall is short for “Warn All”, which will turn on most of the warnings in C++. This will help identify various possible ways your code might go wrong, including array bounds errors and other helpful messages.-Werror: Werror will treat all warnings as errors. This will prevent you from skipping past the possible sources of error in your code, and you will need to make sure all warnings are resolved prior to compiling.-Wpedantic: This flag enables warnings that alert you about language constructs that are not ISO C or ISO C++ standard compliant. This is particularly helpful to identify constructs that may not be uniform in other compilers, which could cause problems with your code on other machines. This will help prevent instances where your code works on your personal computer, but does not work on CodeRunner or on the grader’s computer.-Wsign-compare: This flag enables warnings that alert you about type issues which can occur that are machine dependent. This particular command is crutical for MacOS users to have builds that look like our autograding system.
All together, your command line prompt will look something like this:
g++ -Wall -Werror -Wpedantic -Wsign-compare -std=c++17 myCodeFile.cppPro Tips:
- Tab Complete: if you’re typing something in the command line that’s very long, but unique, you can hit tab when you’re partially through and it will try to fill in the rest (kind of like autocomplete). If it doesn’t, and you press tab twice, it tells you everything it has as options.
- Command history browsing: if you have typed a command and want to repeat it, just press the up arrow. It will bring up your last executed command. Pressing up again will go to the one before. Pressing down will go forward in time through the list.
Anatomy of a C++ Program
You will need a couple of components for the computer to be able to understand how to translate code that you can read into something it can actually do.
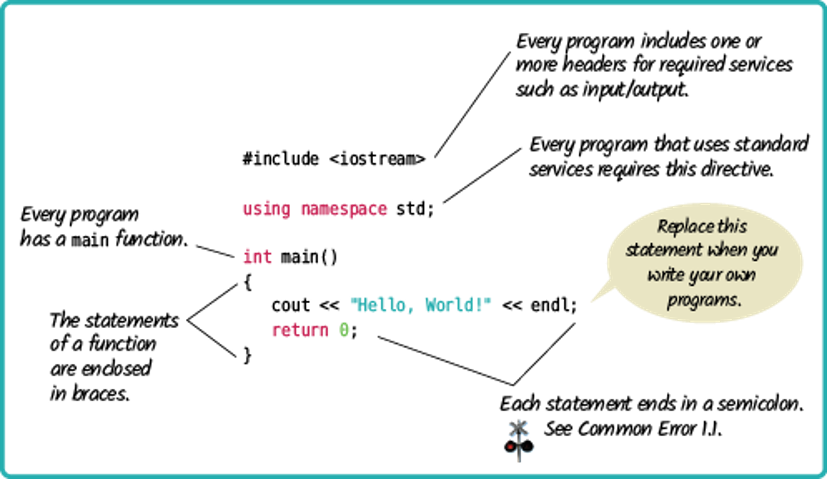
Here is a snapshot of a basic “Hello World” program from the course textbook, Brief C++: Late Objects, Enhanced eText.
Week 2 Background
Variables and Operators
This week we learned about variables and basic arithmetic operators in computer science.
Variables in computer science are similar to variables you have seen in other math and science courses. A variable is a value that can change, depending on conditions or on information passed to the program.
A computer stores variables differently depending on the type of information they are meant to contain, so we must declare the type of variable. This table will tell you the names of different types of variables in C++:
| Type of variable | Declaration in C++ |
Size | Description | Example |
|---|---|---|---|---|
| Integer | int |
2 or 4 bytes | a number that has no decimal value | -42 |
| Float | float |
4 bytes | a number that has short decimal values | 2.98 |
| Double | double |
8 bytes | a number that can have longer decimals | 2.98<...> |
| Character | char |
1 byte | stores a single letter/character using ASCII values | 'h' |
| Boolean | bool |
1 byte | stores either True or False | true |
// Here is an example of declaring variables:
int myNumber = 0;
double myDecimal = 3.1415;
char myEmptyChar;
After declaring variables, you can access them without repeating their data type. You can also perform basic operations, including the ones listed in this table:
Operator |
Description | Example |
|---|---|---|
+ |
Adds together two values | x + y |
+= |
Adds to itself and stores the new value | x += y |
- |
Subtracts one value from another | x - y |
* |
Multiplies two values | x * y |
/ |
Divides one value by another | x / y |
% |
Modulus; this returns the division remainder | x % y |
++ |
Increment; this increases the value of a variable by 1 | ++x |
-- |
Decrement; this decreases the value of a variable by 1 | - |
// Here is an example of declaring variables and using operators:
int myNumber = 4;
int mySecondNumber = 5;
int mySum = myNumber+mySecondNumber;
int myThirdNumber = 6;
mySum = mySum + myThirdNumber;
int myFourthNumber = 7;
mySum += myFourthNumber;
// By the end of this code, the variable `mySum`
// would contain `4+5+6+7`, or rather, `22`.
Characters
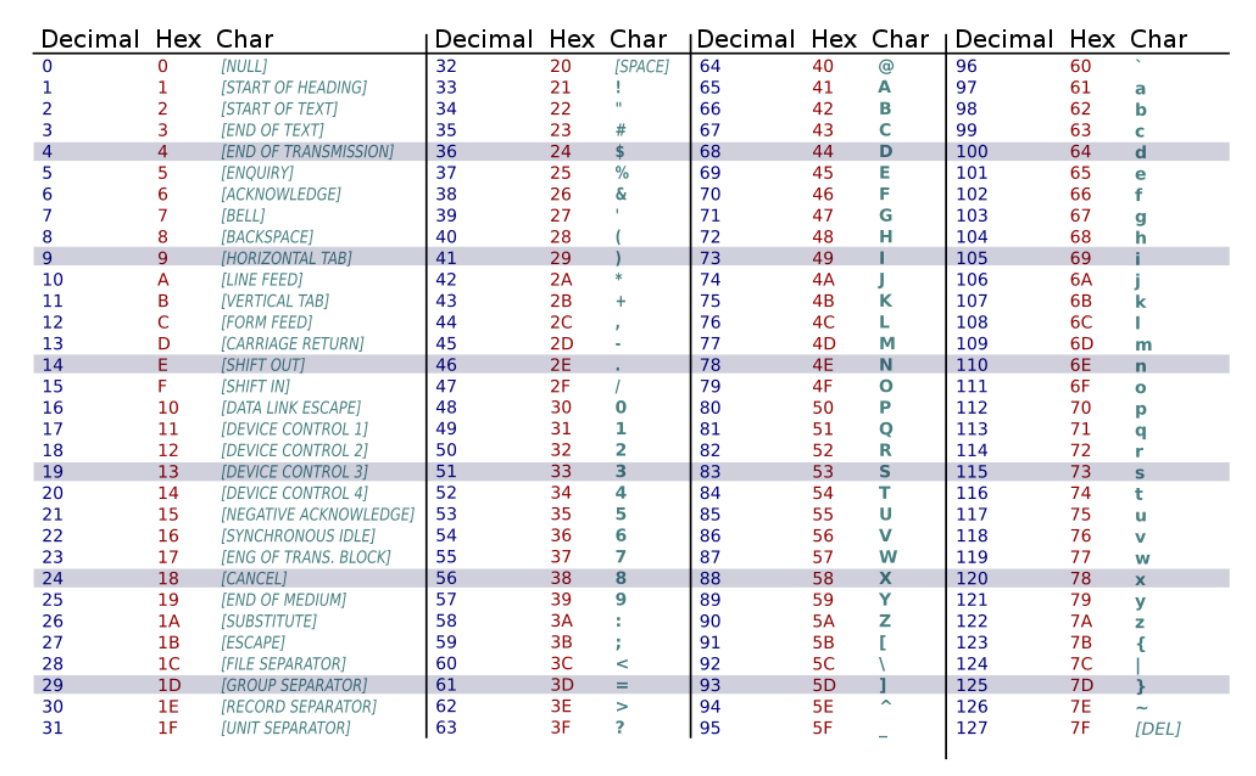
Characters are a variable type that is made of a single byte, which means they can encode for a fairly limited number of characters. We can identify which characters we can store using an ASCII table shown below.
Characters can be referred to by placing the chosen character in single quotation marks, like this:
char myChar = 'a';Characters can also can be accessed using numerical values. Since every sequence of binary numbers that encodes a character could also instead be interpreted as an integer, we can use those numbers to identify which character we are talking about. The integer values that correspond with each letter are shown in the ASCII table.
There are a few traits that you may find helpful as you move forward: firstly, observe that all lower case letters are listed in consecutive alphabetical order, and secondly that all upper case letters are similarly listed in consecutive alphabetical order. This means that the space between a lowercase ‘a’ and a capital ‘A’ is the same as the space between a lowercase ‘b’ and a capital ‘B’ and so on. This is useful for converting characters from lowercase to uppercase.
Strings
In C++, a string is a data type that represents sequences of characters instead of a numeric value (such as int or float). A string literal can be defined using double-quotes. So "Hello, world!", "3.1415", and "int i" are all strings. We can access the character at a particular location within a string by using square brackets, which enclose an index which you can think of as the address of the character within the string. Importantly, strings in C++ are indexed starting from zero. This means that the first character in a string is located at index 0, the second character has index 1, and so on. For example:
string s = "Hello, world!";
cout << s[0] << endl;  //prints the character 'H' to the screen
cout << s[1] << endl;  //prints the character 'e' to the screen
cout << s[4] << endl;  //prints the character 'o' to the screen
cout << s[9] << endl;  //prints the character 'r' to the screen
cout << s[12] << endl; //prints the character '!' to the screen
Note that when a character in a string is accessed with square brackets, the character has type char. For example:
string str = "Example"; //this is a string
char c = str[1]; //this is a char
There are many useful standard functions available in C++ to manipulate strings. One of the simplest is length(). We can use this function to determine the number of characters in a string.
string s = "Hello, world!";
int s_length = s.length();
cout << s_length << endl; //This line will print 13 to the screen
Notice how the length function is called.
The correct way:
s.length()Common incorrect ways:
length(s)  // NO: if only it were so simple...
s.length   // NO: don't forget the ()
Another useful function available for strings is substr(). This function allows us to access a subset, or a small portion, of a longer string. The substring function takes two arguments:
- The starting index of the substring you would like to capture
- The length of the substring you would like to capture (optional)
Note that the second argument is optional. If you don’t pass a second argument to subtring, then the function will print the entirety of the string, beginning with the character at the position specified in the first argument. Note that substr() always returns a variable of type string, regardless of the length of the substring.
For example, consider the code below:
// Substring example code:
string str = "Coding is fun!";
cout << str.substr(0, 6) << endl;
cout << str.substr(6) << endl;
cout << str.substr(1, 1) << endl; //prints a string of length one
This will ouput the following:
Coding
 is fun!
o
Note: The second line of output begins with a space.
Both length() and substr() are special kinds of functions associated with objects, usually called methods, which we will discuss later in the course.
Terminal Input and Output
It is important to be able to take input from the user or to print output to the terminal as your program runs. You can do this using cin and cout for input and output, respectively.
The Hello World program you have seen provides an example of using cout to display output.
// EXAMPLE: Hello World for C++:
#include <iostream>

using namespace std;

int main() {
    cout << "Hello, world!" << endl;

    return 0;
}
You can similarly ask the user for a particular value and store that value in a variable using cin:
// EXAMPLE: An example of collecting user input to sum two integer variables and then printing their sum
#include <iostream>

using namespace std;

int main() {
    int firstNum;
    int secondNum;
    cout << "Please provide one number:" << endl;
    cin >> firstNum;
    cout << "Please provide a second number:" << endl;
    cin >> secondNum;
    cout << "The sum of these two numbers is " << firstNum + secondNum << endl;

    return 0;
}
Pseudocode and Algorithms
Pseudocode is used to develop algorithms. An algorithm is a procedure for solving a problem.
An algorithm describes actions to be executed and the order in which those actions are to be executed. In other words, an algorithm is merely the sequence of steps taken to solve a problem; like a recipe. An algorithm is not computer code. Algorithms are just the instructions which provide a clear path for you to write the computer code.
The main difference between an algorithm and pseudocode is that an algorithm is a step by step procedure to solve a given problem while pseudocode is a method of writing an algorithm. In other words, an algorithm is how to solve a problem while pseudocode is how to implement that solution.
| Algorithm | Pseudocode |
|---|---|
| An unambiguous specification of how to solve a problem. | An informal high-level description of the operating principle of a computer program or other algorithm. |
| Helps to simplify and understand the problem. | A method of developing an algorithm. |
Pseudocode is informal language that helps programmers develop algorithms (or recipes). Although there are no hard and fast rules for pseudocode, there are some suggestions to help make pseudocode more understandable and easy to read.
For instance, consider indenting all statements showing a “dependency”, like statements that use: While, do, for, if.
Several keywords are often used to indicate common input, output, and processing operations.
| Term | A Few Equivalent Terms |
|---|---|
| Input: | READ, OBTAIN, GET |
| Output: | PRINT, DISPLAY, SHOW |
| Compute: | COMPUTE, CALCULATE, DETERMINE |
| Initialize: | SET, INITIALIZE |
| Add one: | INCREMENT, BUMP |
For looping and selection, the keywords that you might consider writing include:
- Do While…
- Do Until…
- Case…
- If… then…
- Call … with (parameters)
- Call
- Return ….
- Return
- When
Try to indicate the end of loops and iteration by using scope terminators.
For instance use if… (statements) ... endif.
Other words you may find useful while writing pseudocode include: Generate, Compute, Process, set, reset, increment, compute, calculate, add, sum, multiply, subtract, divide, print, display, input, output, edit, test, etc.
Be sure to indent if the indentation fosters understanding. Being clear is the purpose of pseudocode, and a very desirable goal to strive for.
Here are some examples of pseudocode:
// Will a grade pass?
/**
 * If students course grade is lower than  60
 *    Then Print, "Failed"
 * else
 *     If students exam grade is lower than  67
 *         Then Print, "Failed"
 *     else
 *         Print, "Passed"
 *     endif
 * endif
 */
// How do you find the area of a rectangle?
    // Read the length of the rectangle
    // Read the width of the rectangle
    // Compute the area of the rectangle as length times width.
You should write pseudocode whenever you are addressing problems in computer science. This allows you space to determine how to solve a problem without worrying about syntax and formatting, instead of having to figure out everything all at once.
Week 3 Background
Booleans
Booleans are a special data type that stores only true or false. This true or false value can be stored in a boolean variable, or it can be the result of evaluating different expressions.
Relational Operators
A relational operator is a feature of a programming language that tests or defines some kind of relation between two entities. These include numerical equality (e.g., 5 == 5) and inequalities (e.g., 4 >= 3). Relational operators will evaluate to either True or False based on whether the relation between the two operands holds or not. When two variables or values are compared using a relational operator, the resulting expression is an example of a boolean condition that can be used to create branches in the execution of the program. Below is a table with each relational operator’s C++ symbol, definition, and an example of its execution.
| Operator | Meaning | Example | Counter Example |
|---|---|---|---|
> |
greater than | 5 > 4 is TRUE |
4 > 5 is FALSE |
< |
less than | 4 < 5 is TRUE |
5 < 4 is FALSE |
>= |
greater than or equal | 4 >= 4 is TRUE |
4 >= 5 is FALSE |
<= |
less than or equal | 3 <= 4 is TRUE |
5 <= 4 is FALSE |
== |
equal to | 5 == 5 is TRUE |
4 == 5 is FALSE |
!= |
not equal to | 5 != 6 is TRUE |
4 != 4 is FALSE |
Logical Operators
Logical operators are used to compare the results of two or more conditional statements, allowing you to combine relational operators to create more complex comparisons. Similar to relational operators, logical operators will evaluate to True or False based on whether the given rule holds for the operands. Below are some examples of logical operators and their definitions.
Operator |
NAME | type | notes |
|---|---|---|---|
<leftOperand> && <rightOperand> |
AND | binary | returns true if and only if both <leftOperand> and <rightOperand> are true |
<leftOperand> || <rightOperand> |
OR | binary | returns true if one or both operands are true |
! <onlyOperand> |
NOT | unary | returns true if the <onlyOperand> is false and false if the <onlyOperand> is true |
Every logical operator will have a corresponding truth table, which specifies the output that will be produced by that operator on any given set of valid inputs. Below are truth tables for each of the logical operators specified above.
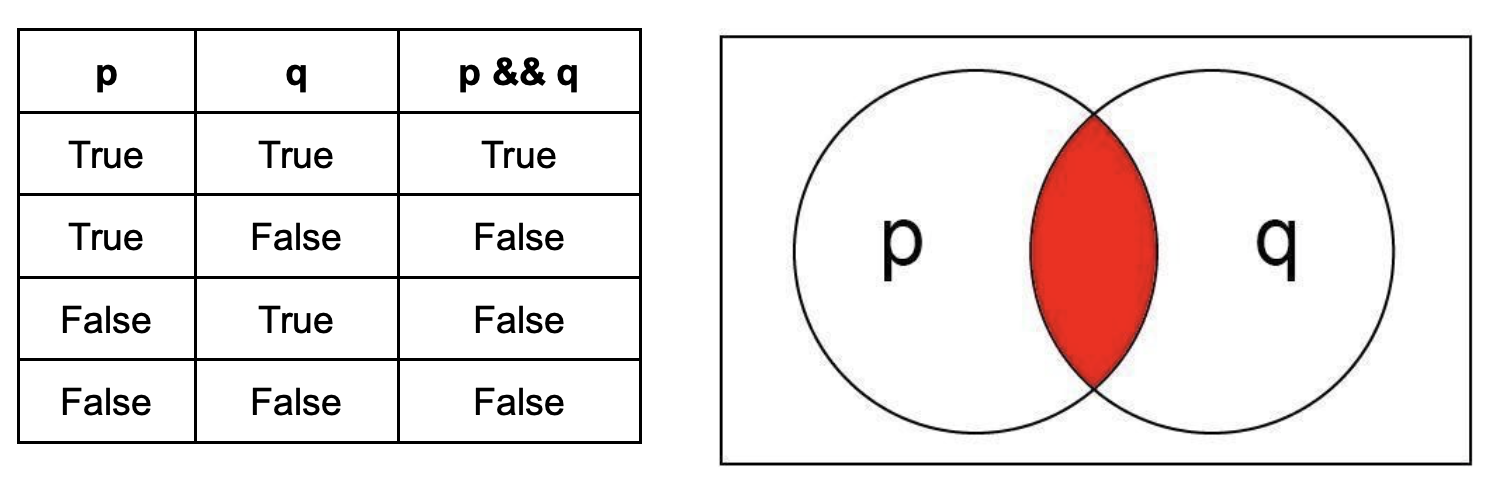
AND ( && ): These operators return true if and only if both operands are True. This can be visualized as a venn diagram where the circles are overlapping.
<leftOperand> |
<rightOperand> |
<leftOperand> && <rightOperand> |
|---|---|---|
| true | true | true |
| true | false | false |
| false | true | false |
| false | false | false |
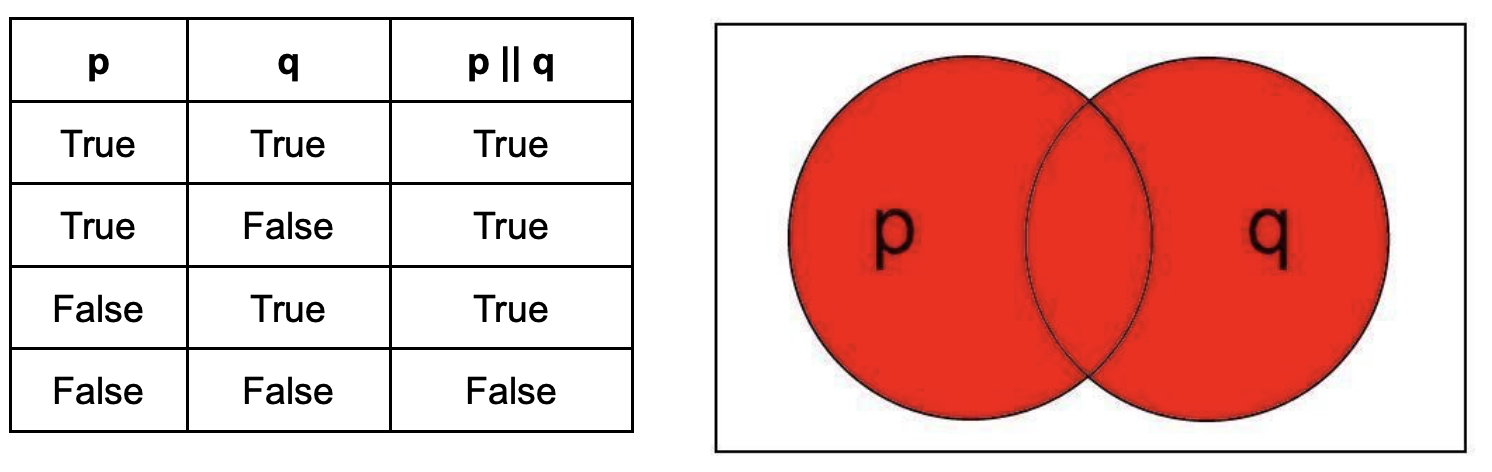
OR ( || ): These operators return True if one or both of the operands are True. This can be visualized as the region of a venn diagram encapsulated by both circles.
<leftOperand> |
<rightOperand> |
<leftOperand> || <rightOperand> |
|---|---|---|
| true | true | true |
| true | false | true |
| false | true | true |
| false | false | false |
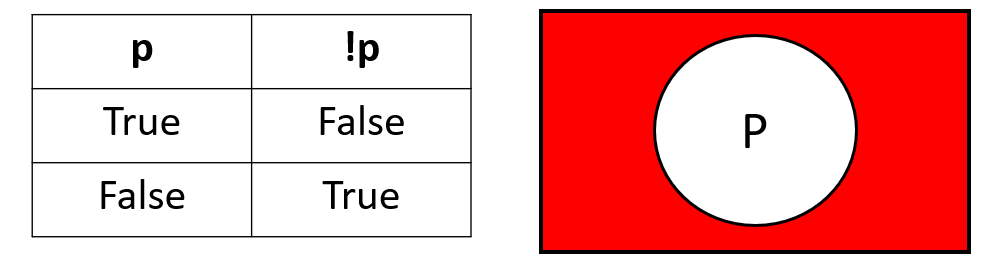
NOT ( ! ): This operator returns the opposite of the operand. This can be visualized as the region of a venn diagram outside the circle. Unlike AND and OR, the NOT operator has only one operand.
<onlyOperand> |
! <onlyOperand> |
|---|---|
| true | false |
| false | true |
You can create truth tables for more complicated expressions by combining elements of these tables. You should begin with columns of the basic variables representing each possible combination of those variables, and then add columns to represent their modified values. For example, if you wanted to create a truth table for !p && q you could make a column for p and a column for q representing all possible combinations of true/false between the two variables. You can then create a third column for !p, and then perform the && operation between the !p and q columns instead of the p and q columns, like this below:
p |
q |
!p |
!p && q |
|---|---|---|---|
| true | true | false | false |
| true | false | false | false |
| false | true | true | true |
| false | false | true | false |
You might also choose to represent this intermediate column with a variable as demonstrated in the table below:
p |
q |
r = !p |
r && q |
|---|---|---|---|
| true | true | false | false |
| true | false | false | false |
| false | true | true | true |
| false | false | true | false |
For simple expressions, you can often work through the truth table in your head. However, knowing how to make truth tables will be helpful when you need more complicated expressions.
Using Booleans
There are two main ways you can use booleans: you can either assign them to a boolean variable, or you can use them directly as a condition (such as in an if statement). If you would like to evaluate a boolean expression and store it in a variable, you can do it like this:
bool myNewBoolean = (4 < 5); // this will evaluate to true
bool mySecondBoolean = (5 == 6); //this will evaluate to false
bool myFinalBoolean = (myNewBoolean && mySecondBoolean); //this will evaluate to false
You can string together increasingly complicated boolean equations either as a combination of boolean variables or as a combination of relational/logical expressions.
Booleans can also be represented using integers, and will print that way by default in C++. As an integer representation, 0 is false and 1 is true.
You can build if statements using boolean variables or boolean expressions.
Truthy/Falsy
This section was added Jan 28 to help give more context for intersted students.
It is important to note that computers work on values 1 and 0. Accordingly the boolean value true is encoded as a 1 and can be used as a 1. The expression true + 5 s valid and evalutates to 6. Likewise false is encoded as 0. Don’t take my word for it, compile and run the following program:
#include<iostream>
using namespace std;


int main() {
    cout << true + 5 << endl;
}
Some things are actually booleans true and false, while some things are not booleans, but can be treated as booleans. We call these “truthy” and “falsy”. Below is a table summarizing a few examples.
| type | truthy examples | falsy examples |
|---|---|---|
| int | 1 1300 |
0 |
| double | 12.3 -7.0 |
0.0 |
We can show this with code as follows:
#include<iostream>
using namespace std;


int main() {

    int i0, i1, i2;
    i0 = 0;
    i1 = 1;
    i2 = 1300;

    double d0, d1, d2;
    d0 = 0.0;
    d1 = 12.3;
    d2 = -7.0;

    cout << "1 means truthy, 0 means falsy" << endl;
    cout << i0 << ":: " << !!i0 << endl;
    cout << i1 << ":: " << !!i1 << endl;
    cout << i2 << ":: " << !!i2 << endl;
    cout << d0 << ":: " << !!d0 << endl;
    cout << d1 << ":: " << !!d1 << endl;
    cout << d2 << ":: " << !!d2 << endl;
}
Conditionals
Conditional statements, also known as decision statements or branching statements, are used to make a decision based on condition. A condition is an expression that evaluates to a boolean value, either true or false. Execution in C++ is a good online resource for learning about conditionals in C++.
There are a few types of conditional expressions such as If statements, If/Else statements, and If/Else If/Else statements each more complicated than the prior but also more dynamic way to make decisions in your code. Other tools for making decisions in your code include Switch statments (that we’ll cover this week) and Ternary expressions (which we may never cover).
IF Statements
An If statement in C++ is composed of a condition and a body. The body is executed only if the condition is true. The condition appears inside a set of parentheses following the keyword “if” and the body appears within a set of curly brackets after the condition:
The general format for if statements is:
// NOTE: if is all lowercase
if ( <CONDITION> ){
    <BODY>
}
It is good practice to vertically align the closing curly bracket with the start of the if statement, and to indent the body. Examples below:
// BEST FOR NOW
if ( <CONDITION> ){
    <BODY>
}

// SOMETIMES USED
if ( <CONDITION> )
{
    <BODY>
}


// PLEASE DON'T
if ( <CONDITION> ) {
<BODY>
}

// THAT'S JUST RUDE.
if ( <CONDITION> ) { <BODY> }
The condition is interpreted as a boolean value, either true or false. If-and-only-if the <CONDITION> holds true then the <BODY> of the If statement is executed
// Here is an if statement that will check
// if a number is negative
// and change it to positive
// (i.e., find the absolute value):

if (num < 0){
    // only occurs if num has a negative value
    cout << "Changing sign" << endl;
    num = -1 * num;
}// works as expected
if (num == 4){
cout << "Found the number 4" << endl;
}// works in a weird way
// NOTE the use of a single `=`
if (num = 4){
cout << "Found any number and replaced it with 4!" << endl;
}
IF-ELSE Statements
If statements may be paired with else statements in C++. If the condition associated with the if statement is false, the body associated with the else statement is executed. The else statement body is enclosed in a set of curly brackets:
 if ( <CONDITION> ){
    <BODY>
    // executed when CONDITION is true
}
else{
    <BODY>
    // executed when CONDITION is false
}
An if statement does not need an else statement, but there must be an if statement before every else statement.
// Here is an if/else statement
// that will check if a number can be a divisor
// before performing division:

if (num == 0) //notice the double equals!{
    cout << "Can't divide by 0!" << endl;
}
else{
    num = 1000 / num; //integer arithmetic
}
ELSE-IF Statements
Finally, an if statement may also be associated with any number of else-if statements. These statements each have an associated condition and an associated body. The body is executed if the condition is true and the conditions for all preceding if- and else-if statements in the same group are false. An else statement may be included at the end of the group but is not required. The else statement will be executed if all the previous conditions are false.
if ( <CONDITION> ){
    <BODY>
}
else if ( <CONDITION> ){
    <BODY>
}
else if ( <CONDITION> ){
    <BODY>
}
else{
    <BODY>
}
This is not logically the same as having multiple sequential if statements.
// These two if statements:
if ( <CONDITION A>){
    // do X
}
if ( <CONDITION B>){
    // do Y
}

// are NOT logically the same as this if/else-if statement:
if( <CONDITION A>){
    // do X
}
else if ( <CONDITION B>){
    // do Y
}
In the first code section, both if statements are evaluated. If both CONDITION A and CONDITION B are true, we will do both X and Y. Meanwhile, in the second code block, if CONDITION A is true we will never evaluate CONDITION B, and therefore never do execute that code; here, we will only do X. Therefore, we need to use “else if” only when we want the two conditions to be mutually exclusive.
// Here is an if/else if/else statement
// to tell you if a number is:
//     positive,
//     0,
//     or negative::
if ( num > 0 ){
    cout << "Positive" << endl;
}
else if ( num == 0 ){
    cout << "Zero" << endl;
}
else{
    cout << "Negative" << endl;
}
Nested If Statements
You can put if statements inside of other if statements (or if/else, or if/else if/else). The meaning of logical expressions can change when you are nesting if statements, so you should think through the truth tables for your if/else statements carefully.
if ( booleanExpression1 ) {
    // anything here will evaluate if booleanExpression1 is true
    if ( booleanExpression2 ) {
        // we will only evaluate this if statement if booleanExpression1 is true,
        // and then will only execute this statement if booleanExpression2 is ALSO true
    }
}
Nested if statements are essentially performing a logical “AND” operation on the two boolean expressions for the innermost if statement, but if only the first if statement is true you can still do other things.
Common Errors
// Here is some (incorrect) code:
// We've mentioned it 3 times because it's just that common of an issue
int x = 5;
if (x = 1){ // one equal sign: changes value of x, will always evaluate to true
    cout << "The condition is true." << endl;
}
cout << "x is equal to " << x << "!" << endl;
The output of this would look like this:
The condition is true.
x is equal to 1
// What you would ACTUALLY want is:
// CORRECT CODE
int x = 5;
if (x == 1) // two equal signs, performs comparison
{
    cout << "The condition is true." << endl;
}
cout << "x is equal to " << x << endl;
Which would output:
x is equal to 5
Week 4 Background
Switch Statements
Switch statements are an easy way to make decisions in a program. We can execute different sections of our code based on the value of a character or integer variable.
- If we are building a switch statement around an
intvariable, all of the cases must be defined using numbers. - If we are building a switch statement around a
charvariable, all of the cases must be defined using characters. This means they must also use single quotes.
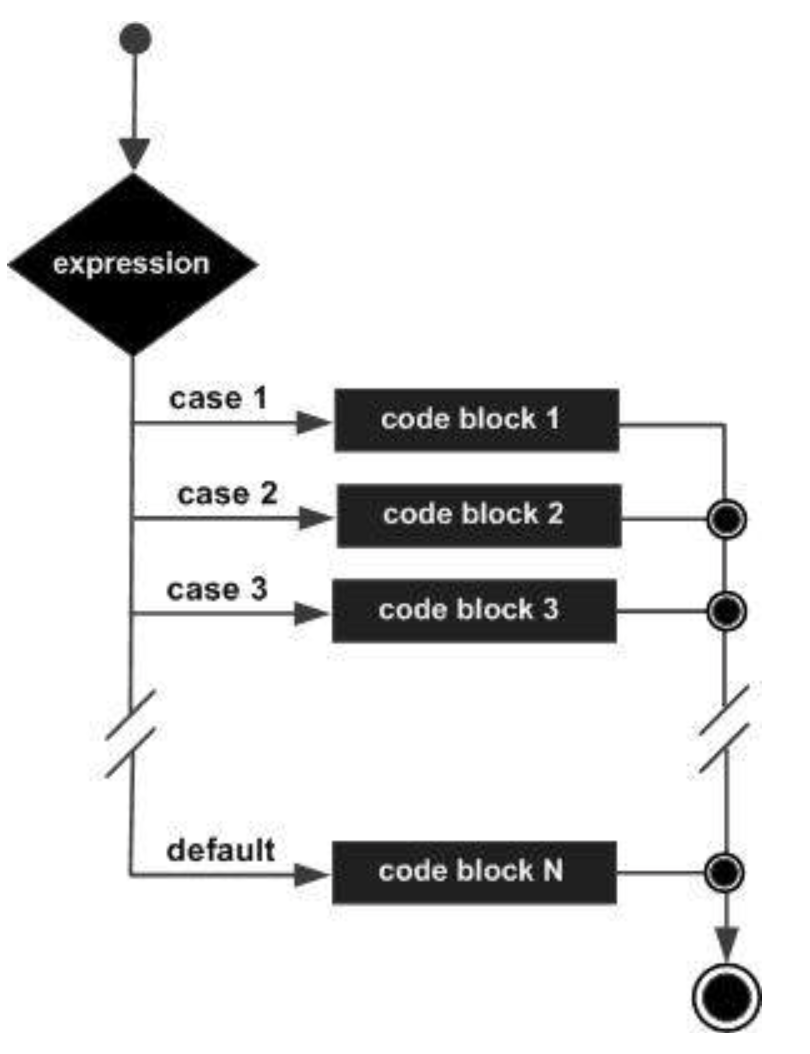
With the switch statement, the variable name is used once in the opening line. The case keyword is used to provide the possible values of the variable, which is followed by a colon and a set of statements to run if the variable is equal to a corresponding value.
An example of a simple switch statement:
// Switch statement syntax:
switch (n){
    case 1:
        // code to be executed if n == 1;
        break;
    case 2:
        // code to be executed if n == 2;
        break;
    default:
        // code to be executed if n doesn’t match any cases
}
Important notes to keep in mind when using switch statements :
- The expression provided in the switch should result in a constant value otherwise it would not be valid.
switch(4)allowed, allowed for anyintvalue (anyintexpression)switch(num)allowed, werenumis anintvariable defined earlier (anyintexpression)switch(a+b)allowed, whereaandbareintvariables, which are defined earlier (anyintexpression)switch('c')allowed (takes the ASCII Value of the characterc, here99)
- The
breakstatement is used inside the switch to terminate a statement sequence. When abreakstatement is reached, the switch terminates, and the flow of control jumps to the next line following the switch statement. - The
breakstatement is optional. If omitted, execution will continue on into the next case. The flow of control will fall through to subsequent cases until a break is reached. - The default statement is optional. Even if the switch case statement does not have a default statement, it would run without any problem.
Switch statements are a simple way to make decisions based exclusively on the equivalence of some characters or numbers. They are a simple form of conditional statement.
Functions
“Functions” in the context of math may be familiar, especially when formatted like this:
Here we have labeled our function f, and it is a function of the variable x. You might have seen some where the functions are functions on multiple variables:
Here we have labeled our function g, and it is a function of two variables x and y (reading from left to right).
Functions in computer science are similar, but we can abstract them further so they apply to more than just numbers.
A function is a named block of code which is used to perform a particular task. The power of functions lies in the capability to perform that task anywhere in the program without requiring the programmer to repeat that code many times. This also allows us to group portions of our code around concepts, making programs more organized. You can think of a function as a mini-program.
There are two types of functions:
- Library functions
- User-defined functions
Library functions refer to pre-existing functions that you can use but did not write yourself. In order to use a library function, you must include the library that contains the function. For example, the C++ math library provides a sqrt() function to calculate the square root of a number. To use the sqrt() function, you must include the cmath library at the top of your program, e.g.#include<cmath>. Libraries other than the built-in C++ libraries can be found online.
C++ allows programmers to define their own functions. These are called user-defined functions. Every valid C++ program has at least one function, the main() function.
We pass values to functions via parameters. In general, the parameters should be all the information needed for the function to do its work. When that work is complete, we would like to use the result in other code. The function can return one value of the specified return type. A function may also return nothing, in which case its return type is void.
Here is the syntax for a function definition:
returnType functionName(parameterList)
{
    //function body
}- The
returnTypeis the data type that the function returns functionNameis the actual name of the functionparameterListrefers to the type, order, and number of the parameters of a function. A parameter is like a placeholder. When a function is invoked, you pass a value to the parameter. This value is referred to as actual parameter or argument. Note: this can be a list of multiple items separated by commas.//function bodycontains a collection of statements that define what the function does. The statements inside the function body are executed when a function is called.
This may not immediately look like the functions you have seen in math, but they are actually quite close. Here is an example of the functions above written in C++:
// The function `f(x) = x^2 + 5` written in C++:
double f(double x){
    return ( x\*x + 5 );
}
// The function `g(x,y) = x^2+y^3` written in C++:
double g(double x, double y){
return ( x*x + y*y\*y );
}I used double for the parameters and the return type because these functions in math would probably use decimals (real number), but you could also use integers if you only wanted to use whole numbers. We can also use functions inside of other functions. Instead of just multiplying variables by themselves to do the exponents, we could use the pow function from cmath. We have seen the cmath library before but likely didn’t fully understand what it did:
// The function `f(x) = x^2 + 5` written using cmath:
#include<cmath>

double f(double x){
    return pow(x, 2) +5;
}
//The function `g(x,y) = x^2+y^3` written using cmath:
#include<cmath>
double g(double x, double y){
return pow(x, 2) + pow(y, 3);
}If you wanted to then use these functions to perform some calculations, you could use any value of x and y. You could use constant values, or you could use variables. Here are examples of ways you could use the function:
// Examples of calling the function `g(x,y)`:
#include<cmath>
#include<iostream>

using namespace std;

double g(double x, double y){
    return pow(x, 2) + pow(y, 3);
}

int main() {
    double firstValue = g(4.0, 5.0);
    double secondValue = g(2, 3);
    double myX, myY;

    cout << "What value would you like for X?" << endl;
    cin >> myX;
    cout << "What value would you like for Y?" << endl;
    cin >> myY;
    cout << "The result would be " << g(myX, myY) << endl;

    return 0;

}
A function has its own scope. That means that the parameters of the function, as well as local variables declared within the function body, are not accessible outside the function. This is useful because it allows us to solve a small problem in a self-contained way. Parameter values and local variables disappear from memory when the function completes its execution. We can illustrate the order in which code executes with this example:
// An example with a simple function:
#include <iostream>
using namespace std;

//funtion to add two numbers
int sum( int num_one, int num_two)
{
    int result = num_one + num_two;
    return result;
}

//main function
int main()
{
    //declare parameter value
    int parameter_var = 1;

    //call the function
    int sum_result = sum(parameter_var, 99);

    cout << "The sum is " << sum_result << endl;

    return 0;

}
The code will begin executing in the main function – in this case, the first step is declaring a variable in line 15. When the program execution reaches line 18, the main function will pause, and the first line in the body of the sum() function will begin running. After the line return result; is reached, sum() will stop running, and the main program will resume execution where it left off. In this case, when main() resumes execution, the return value of sum() will be stored in int sum_result, and then the last two lines of the main function will run.
Let us clarify this point with a few changes to the above example
// NOTE any comment
#include <iostream>
using namespace std;

int sum( int num_one, int num_two)
{
    int result = num_one + num_two;
    return result;
}

// main function
int main()
{
    // NOTE: a result variable set to 42 in main
    int result = 42;

    int parameter_var = 1;

    //call the function
    int sum_result = sum(parameter_var, 99);

    // NOTE: an update to result
    result = 75;

    cout << "The sum is " << sum_result << endl;

    return 0;

}
In the above example sum-result is still 100. There are now two variables named result one is scoped only to the sum() function and happens to get the value 100 at some point in time. That result variable has no awareness of the other variable named result that is scoped to the main() function (starts with value 42 and is later set to 75).
Functions can do more than just perform calculations; they can also perform operations on other variables, or they can be used to prevent yourself from copy/pasting the same code multiple times in your program. They do not even always need parameters. For example, if you wanted to write out a selection menu, you could write a function to print the menu so you do not have to type it out every time. In these cases, the parenthesis can be empty, like they are for our main functions.
As a general note: the function names f and g are not very good function names. You should generally pick better (clearer) names, and you should choose a naming style to be consistent. The naming style you choose should be different from how you name variables, so it is easier to read your code.We recommend using camel case to name your functions, like so:
Examples of function names we might use: circleArea(), sumList(), findCapitalLetters()
Testing Code
You must naturally test your code to make sure that it works correctly, and that it works correctly all the time. This may seem like a very difficult task, but there are several steps you can take to make sure you start correctly.
- Come up with a handful of test cases to use on your program.
- Consider the ways a user could use your program incorrectly. Use this to develop additional test cases.
- Consider extreme values, or “boundary conditions”. Use these boundary conditions to develop yet more test cases.
- Test each part of your program independently. This is called “Unit Testing”. Do you have individual functions? Test each of them. Do you have major steps in your main function? Test each of them.
Boundary conditions are significant for many complex problems, and should test the extreme limits of what your problem may be applied to. Example: Are you supposed to examine a string? What happens if that string is empty? What happens if that string is thousands of digits long?
You should develop test cases for each boundary condition you can come up with. If there are several components to your program, you may need to identify boundary conditions for each of these components. Testing these boundary conditions of these pieces individually – whether they are functions or just blocks of code in your main function – is often easier than testing every independent combination of them.
Consider a program where you have 4 functions, and each function has 3 boundary conditions. To test each boundary condition for each of the 4 functions, you would need 12 tests. If however you only tested the program as a whole, you might need to check each combination of boundary conditions, which would end up becoming 34 = 81 different tests. This is part of why unit testing is valuable.
As you develop extra functions, you should start by using your main function to test these functions. There will be 3 different types of test cases you should be expected to write depending on the return type of the function. Listed below is how we expect you to test different types of functions. The process will be different for if you are testing a void function, non-void functions that return an int or bool, and non-void functions that return a double.
Testing Void Functions
For void functions that have printed output (i.e. functions that use cout to print to the terminal), call the testing function in the main function. Your tests should include the expected output in comments. For these functions you will want to make sure that all expected outputs are successfully printed.
See the example code below:
// This is testing a function that prints whether a grade is passing or not.
void checkGrade(char grade){
    switch(grade) {
        case 'a':
        case 'b':
        case 'c':
            cout << "You passed!" << endl;
            break;
        case 'd':
            cout << "You did not pass by some University standards"
                 << ", but you were close." << endl;
            break;
        case 'f':
            cout << "You failed." << endl;
            break;
        default:
            cout << "That is not a valid grade." << endl;
    }
}

int main(){
    checkGrade('b'); //Should output "You passed!"
    checkGrade('d'); //Should output "You did not pass, but you were close."
    checkGrade('f'); //Should output "You failed."
    checkGrade('m'); //Should output "That is not a valid grade."
}
Testing Integer/Boolean Functions
For non-void functions that return a bool or int, use an assert statement from the cassert header (#include <cassert>) with a conditional expression.
Assert tests contain a conditional expression which will be true unless there is a bug in the program. If the conditional expression evaluates to false, then your program will terminate and show an error message.
For immediate purposes, functions that return a bool or int can be compared to a specific value using the equality operator ==.
Your test will look something like this:
assert(<function call> == <value to compare to>);
<function call>is where you will call the function you want to test with its function parameters.<value to compare to>is the value you expect the function to return.==is the equality operator, and it compares the equality of both sides of itself.
See the sample code below:
// The below code shows examples of how to test integer functions with a simple addition function:
#include <iostream>
#include <cassert>
using namespace std;

int addInts(int num1, int num2)
{
    // add num1 and num2 before returning
    return num1 + num2;
}

int main()
{
    // test 1 for addInts
    assert(addInts(5, 6) == 11);
    // test 2 for addInts
    assert(addInts(10, 10) == 20);
}
Testing Double Functions
For non-void functions that return a double, use an assert statement from the cassert header (#include <cassert>) with a conditional expression and include the following function in your program:
// This is a required function to successfully test Double functions in C++:
/*
  - doublesEqual will test if two doubles are equal to each
  - other within two decimal places.
*/
bool doublesEqual(double a, double b, const double epsilon = 1e-2)
{
    double c = a - b;
    return c < epsilon && -c < epsilon;
}
Because the double type holds so much precision, it will be hard to compare the equality of a function that returns a double with another double value. To overcome this challenge, we can compare double values within a certain range of precision or decimal places. The function above compares the equality of two values a and b up to two decimal places. This function returns true if the values a and b are equal with each other up to two decimal places.
You will be expected to use this function in conjunction with assert statements to test functions that return the type double.
Your test will look something like this:
assert(doublesEqual(<function call>, <value to compare to>));
<function call>is where you will call the function you want to test with its function parameters<value to compare to>is the double value you expect the function to return.
See the sample code below:
// This is code to test a function that finds the reciprocal of a value (i.e., divides 1 by that number).
#include <iostream>
#include <cassert>
using namespace std;

/*
  - doublesEqual will test if two doubles are equal to each other within
  - two decimal places.
*/
bool doublesEqual(double a, double b, const double epsilon = 1e-2) {
    double c = a - b;
    return c < epsilon && -c < epsilon;
}

/*
  - reciprocal returns the value of 1 divided by the number
  - passed into the function.
*/
double reciprocal(int num) {
    return 1.0 / num;
}

int main() {
    // test 1 for reciprocal
    assert(doublesEqual(reciprocal(6), 0.16));
    // test 2 for reciprocal
    assert(doublesEqual(reciprocal(12), 0.083));
}
General Testing Tips
You will certainly come to a time in your coding career when your code does not work, and you just cannot figure out why.
In these times, there are a few possible options. First, your algorithm may be incorrect. If that is the case no amount of code testing will help you, and you will need to go back and think through how to solve the problem. If your algorithm is correct but your code is not, here are three tips:
- If your code does not compile, start commenting out sections of your code. Keep going until it compiles, even if you have to go all the way back to an empty main function. Then, you can uncomment sections of your code until it fails to compile again. This will help you pinpoint where the issue is in your code, and once you know where it is you will be able to see what it is.
- If your code compiles but has unexpected runtime errors, add output statements periodically throughout your code. When your program fails, you will know where your code stopped running based on which output statements failed to print.
- If your code compiles and runs completely but the output is incorrect, go back through your code and print out the significant variables at each step in your code. You can then compare this to the test cases you worked out by hand and see where the code output differs from your algorithm.
Week 5 Background
Loops are a tool that allows us to repeat a block of code. The number of repetitions is controlled by the conditions of the loop, and can range anywhere from never executing, executing a fixed number of times, or executing an infinite number of times. Loops will execute for as long as their condition is satisfied; once the condition is not true, the loop will stop and the program will continue. The structure of these conditions can vary depending on the type of loop used. There are three main types of loop we use in C++; the while loop, the do-while loop, and the for loop.
While Loops
While loops are the most basic form of loops. Their structure looks like:
while (condition)
{
    //code to execute
}
Here, while is a C++ reserved word, condition should be a Boolean expression that will evaluate to either true or false, and the comment between the brackets is where we would add code to execute. If the condition is true, then the specified statement(s) within the loop are executed. After running once, the Boolean expression is re-evaluated. If the condition is true, the specified statement(s) are executed again. This process of evaluation and execution is repeated until the condition becomes false.
// Here is an example of a while loop
// where the condition is based on user input.
int userChoice;
userChoice = 1;
while (userChoice != 0)
{
   cout << "Do you want to see the question again?" << endl;
   cout << "Press 0 if no, any other number if yes." << endl;
   cin >> userChoice;
}
Entering 0 will terminate the loop, but any other number will cause the loop to execute again. Note how we must initialize the condition before the loop starts. Setting userChoice = 1 ensures that the while loop will run at least once.
// Here is an example of a while loop
// where the condition is based on a counter.
int i;
i = 0;
while (i < 5)
{
    cout << i << endl;
    i = i + 2;
}
Notice how you must manually initialize i=0 and then manually increment i by 2 (i = i + 2).
Do-While Loops
The do-while loop is a variant of the while loop. The critical difference with a do-while loop is that the block of code we wish to execute is written before the condition. The structure of a do-while loop looks like this:
do {
  // code block to be executed
}
while (condition);
In a do-while loop, the block of code is executed once before the condition is checked. This means we will never entirely skip a do-while loop. You will often find this type of loop to be useful when gathering user input, like the example shown below.
// Here is an example of the while loop from example 1.1.1. rewritten as a do-while loop.
int userChoice;
do {
   cout << "Do you want to see the question again?" << endl;
   cout << "Press 0 if no, any other number if yes." << endl;
   cin >> userChoice;
}
while (userChoice != 0);
Note that here we do not have to initialize user choice before the loop begins.
For Loops
You will frequently come across instances where you already know the number of iterations you would like your loop to complete, like the while (i < 5) example shown above. In these cases, there is a special loop that has a counter built in rather than needing to keep track on your own. For loops have three elements, which we call the “three Cs” create, compare, change:
- CREATE: It must create/”initialize” a counter variable to a starting value. Note: When initializing your counter, you can choose to either declare a new variable or use an existing variable. If you declare a new variable in your initialization, it will only exist in the scope of the loop; this means once the loop concludes, you cannot access that variable again.
- COMPARE: many things as a logical expression. if the expressions value is true, then the body of the loop is executed. If it is false, the body of the loop does not execute and jumps to the next statement(s) just after the loop.
- CHANGE: Update the counter variable during each iteration
The basic structure of a for loop looks like this:
for ( create ; compare ; change )
{
    //code to execute
}
Here, for is a C++ reserved word.
// Here is a section of code that will
// print the word "hello" five times:
for ( int count = 0 ; count < 5 ; count++ )
{
    cout << "hello" << endl;
}
Notice the following three parts of the for loop:
- CREATE: count is initialized to 0,
- COMPARE: the conditional expression is count < 5
- CHANGE: count++ to increment the count value by one
// Here is an example that would work e
// quivalently to the `while (i < 5)` example
for (int i = 0; i < 5; i = i + 2)
{
    cout << i << endl;
}

// REMINDER of `while (i < 5)` example:
int i;
i = 0;
while (i < 5)
{
    cout << i << endl;
    i = i + 2;
}
-Wsign-compare
As we deal with loops it becomes particularly important that we add -Wsign-compare to our build commands.
g++ -Wall -Werror -Wpedantic -Wsign-compare -std=c++17 myCodeFile.cpp
Common Errors and Debugging Loops
Unique errors with loops include:
- Errors with the loop syntax itself, such as your condition or the set of statements in your for loops. Check that you have semicolons
;and have declared all your variables that you use in this area. - infinite loops, which will frequently present as either a program that never stops running or an error saying something along the lines of memory exceeded or time exceeded. Check your conditions, and make sure the variables that control your condition are updating correctly.
- incorrect numbers of iterations, which means you may not be updating your counter correctly or your logic may be incorrect.
Here is a flowchart for helping you figure out (and resolve) what is wrong with your loops:
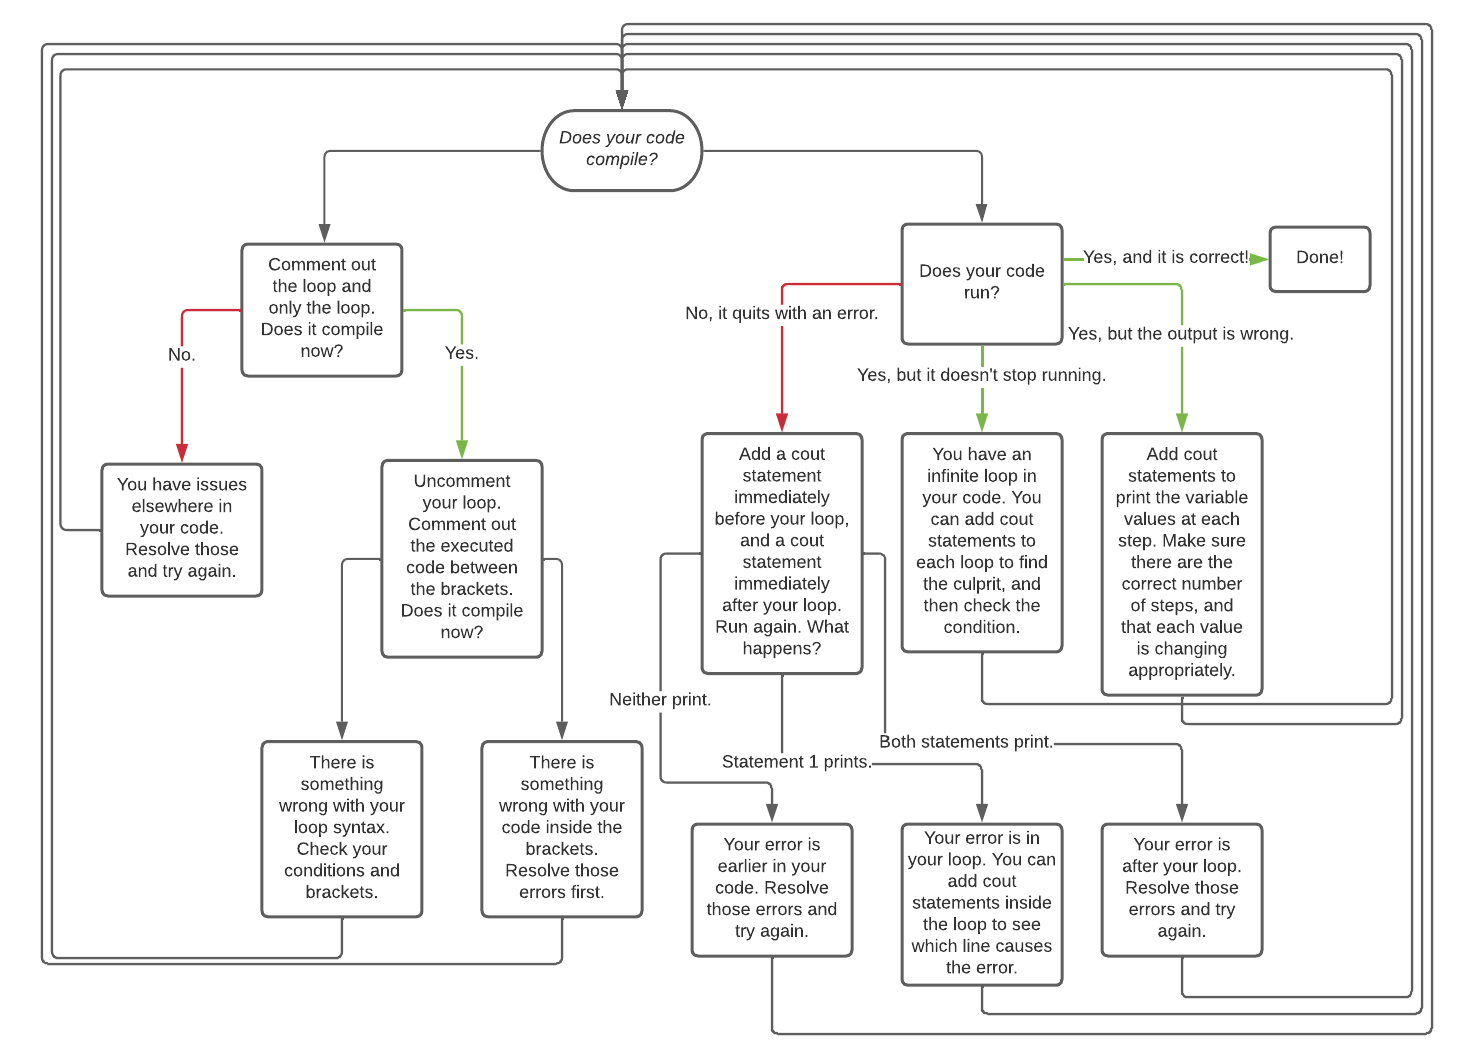
Any errors that you may come across either within the bracketed section of your loop or outside of your loop are subject to the same rules as any code we have previously worked with. If you are struggling with errors in those areas, revisit debugging tips from the relevant sections to help you.
The details of the flowchart are written here in text for better accessible technology support:
Does your code compile?
- no: comment out the loop and only the loop. does it comile now?
- no: You have issues elsewhere in your code. Resolve those and try again.
- yes: Uncomment your loop. Comment out the executed code between the brackets. Does it compile now?
- no: there is something wrong with your loop syntax. Check your conditions and brackets.
- yes: There is something wrong with your code inside the brackets. Resolve those errors first.
- yes: Does your code run?
- no: it quites with an error. add a cout statement immediately before your loo, and a cout statement immediately after your loop. Run again. what happens?
- neith print: your error is earlier in your code. Resolve those errors and try again.
- only the first statement prints: your error is in your loop. You can add cout statements inside the loop to see which line casues the error.
- both statements print: your error is after your loop. Resolve those errros and try again..
- yes: but it doesn’t stop running: you have an infinite loop in your code. You can add cout statements to each loop to find the culprit, and then check the condition.
- yes: but the output is wrong: Add cout statements to print the variable values at each step. Make sure there are the correct number of steps, adn that each value is changing appropriately.
- yes, and it’s correct!: Done!
- no: it quites with an error. add a cout statement immediately before your loo, and a cout statement immediately after your loop. Run again. what happens?
Week 6 Background
This was midterm exam 1, there is no relevant background section.
Week 7 Background
An array is a data structure which can store other data types like double, int, char, and boolean, and string. Arrays have both a type and a size.
Making Arrays
How to declare arrays
// data_type array_name[declared_size];
bool myBooleans[10];
string myStrings[15];
int myInts[7];
How to initialize arrays (method 1)
bool myBooleans[4] = {true, false, true, true};If you do not declare the size inside the square brackets, the array size will be set to however many entries you provide on the right.
bool myBooleans[] = {true, false, true}; // size = 3Note: the size specified in the brackets needs to match the number of elements you wrote in the curly brackets.
/**
 * When the specified size is larger than the actual number of elements,
 * the elements provided in the curly brackets will be the first several
 * elements in the array, while the additional elements will be filled
 * with default values. If it’s an integer/double array, the default
 * values are zero, while if it’s a string array, the default values
 * are empty strings.
 */
#include <iostream>
using namespace std;
int main()
{
    int intArray[5] = {1,2,3};
    for (int i = 0; i < 5; i ++)
    {
        cout << intArray[i] << " ";
    }
}
// OUTPUT:
// 1 2 3 0 0
/**
* When the specified size is smaller than the actual number of elements,
* there will be a compilation error.
*/
#include <iostream>
using namespace std;
int main()
{
int intArray[3] = {1,2,3,4,5};
}
// OUTPUT:
// error: excess elements in array initializer
// int intArray[3] = {1,2,3,4,5};
// ^
// 1 error generated.How to Initialize Arrays (Method 2) You can also initialize elements one by using the arrays index. Note that the left most element has index 0, NOT index 1:
// method 1
int someInts[5] = { 2, 4, 6, 8, 10 };

// method 2
int alsoSomeInts[5];
alsoSomeInts[0] = 2;
alsoSomeInts[1] = 4;
alsoSomeInts[2] = 6;
alsoSomeInts[3] = 8;
alsoSomeInts[4] = 10;
How to Initialize Arrays (Method 3) Or course you can also initialize elements one by one using a for loop:
int yetAnotherVersionOfSomeInts[5];
// NOTE: i += 2 rather than i++ to match the arrays of method 2 above
int yetAnotherVersionOfSomeInts[5];
for (int i = 0; i < 5; i++ )
{
    yetAnotherVersionOfSomeInts[i] = (i+1)*2;
}
// { 2, 4, 6, 8, 10 }
How to Access Elements in an Array
We have essentially already had practice with accessing elements in an array, as in C++, string is basically an array of characters. You can access elements in arrays using the same syntax you used for strings:
string greetings[] = {"hello", "hi", "hey", "what’s up?"};
cout << greetings[3] << endl;
Arrays and strings can also be iterated through in the same way. See these two examples:
// Iterating through an array of many strings:
string greetings[] = {"hello", "hi", "hey", "what’s up?"};
int size = 4;
for (int i = 0; i < size; i++)
{
    cout << greetings[i] << endl;
}
// Iterating through a single string:
string greeting = "Hello world!";
for (int i = 0; i < greeting.length(); i++){
cout << greeting[i] << ", " << endl;
}
Code to Play With
Here is some code to play with if you are interested. Note how it builds a printing function for us. Exercise: run this code to exectue the printing function with a larger array.
#include<iostream>
using namespace std;

void formattedDisplayArray( string title, int arr[], int len )
{
    cout << title << "\n";
    for ( int index = 0 ; index < len ; index++ )
    {
        cout << "\tarr[" << index << "] == " << arr[index] << "\n";
    }
    return;
}

int main()
{
    // method 1
    int someInts[5] = { 2, 4, 6, 8, 10 };

    // method 2
    int alsoSomeInts[5];
    alsoSomeInts[0] = 2;
    alsoSomeInts[1] = 4;
    alsoSomeInts[2] = 6;
    alsoSomeInts[3] = 8;
    alsoSomeInts[4] = 10;

    // method 3
    int yetAnotherVersionOfSomeInts[5];
    for (int i = 0; i < 5; i++ )
    {
        yetAnotherVersionOfSomeInts[i] = (i+1)*2;
    }

    formattedDisplayArray( "METHOD 1", someInts, 5 );
    formattedDisplayArray( "METHOD 2", alsoSomeInts, 5 );
    formattedDisplayArray( "METHOD 3", yetAnotherVersionOfSomeInts, 5 );

    // TODO: call formattedDisplayArray on an array of your own creation
    //       with length 10

    return 0;
}
Passing Arrays By Reference
Up until now, when calling functions, we have always passed by value. When a parameter is passed in a function call, a new variable is declared and initialized to the value passed in the function call. This has likely led to many questions about why our function calls are not changing the values of variables in main.
Observe that the variable x in main and variable x in AddOne are separate variables in memory. When AddOne is called with x on line 10, it is the value of 5 that is passed to the function. This value is used to initialize a new variable x that exists only in AddOne’s scope. Thus the value of the variable x in main’s scope remains unchanged even after the function AddOne has been called.
1
2
3
4
5
6
7
8
9
10
11
12
13
14
15
16
17
18
19
// Pass by value:
void AddOne(int x){
    x = x + 1;
    cout << "AddOne" << x << endl;
}

int main(){
    int x = 5;
    cout << "main: " << x << endl;
    AddOne(x);  /** LINE 10 */
    cout << "main: " << x << endl;
    cout << "Ask yourself, why doesn't the above line print main: 6?" << endl;
}

// OUTPUT:
// main: 5
// AddOne: 6
// main: 5
// Ask yourself, why doesn't the above line print main: 6?
Passing By Reference: Arrays, on the other hand, are passed by reference (a reference to the original array’s location in the computer’s memory). So, when an array is passed as a parameter, the original array is used by the function. Observe that there is only one array X in memory for the following example. When the function AddOne is called on line 10, a reference to the original array X is passed to AddOne. Because the array X is passed by reference, any modifications done to X in AddOne are done to the original array. These modifications persist and are visible even after the flow of control has exited the function and we return to main.
1
2
3
4
5
6
7
8
9
10
11
12
13
14
15
16
17
18
19
// Pass by reference example:
void AddOne(int X[]){
   X[0] = X[0] + 1;
   cout << "AddOne: " << X[0] << endl;
}

int main(){
    int X[4] = {7, 5, 3, 2};
    cout << "main: " << X[0] << endl;
    AddOne(X);  /** LINE 10 */
    cout << "main: " << X[0] << endl;
    cout << "Ask yourself, why doesn't the above line print main: 7?" << endl;
}

// OUTPUT:
// main: 7
// AddOne: 8
// main: 8
// Ask yourself, why doesn't the above line print main: 7?
When we pass a one-dimensional array as an argument to a function we also provide its length. For two-dimensional arrays, in addition to providing the length (or number of rows), we will also assume that we know the length of each of the subarrays (or the number of columns). A function taking a two-dimensional array (somtimes called a matrix) with 3 rows and 10 columns as an paremeter might look something like this:
void TwoDimensionalFunction( int matrix[3][10], int rows )
{
    // ...
}
Multidimensional Arrays
In C++ we can declare an array of arrays known as a multidimensional array. Multidimensional arrays store data in tabular form.
How to Declare Multidimensional Arrays
// data_type array_name[dimension_1][dimension_2]....;
int myInts[7][5];  // 7 rows, 5 columns
bool myBooleans[10][15][12];  // 10 rows, 15 columns, 12 depths
string myStrings[15][10];  // 15 rows, 10 columns
How to Initialize Multidimensional arrays (Method 1)
int myInts[2][2] = {1, 2, 3, 4};The 2D array in this case will be filled from left to right from top to bottom.
int myInts[2][2] = { {1, 2}, {3, 4} };You can also initialize a 2D array by explicitly separating the rows as shown above.
How to Initialize Multidimensional arrays (Method 2) You can also initialize elements using nested loops:
int myInts[2][2];
for(int i=0; i < 2; i++)
{
    for(int j=0; j < 2; j++)
    {
        myInts[i][j] = i + j;
    }
}
The above code will create the following 2D array: { {0,1}, {1,2} }.
How to Access Elements in a Multidimensional array
You can use myInts[i][j] to access the ith row and jth column of a 2D array
Multidimensional arrays can be iterated using nested loops as shown below:
int myInts[2][2] = { {0,1}, {1,2} };
int res = 0;
for(int i=0; i < 2; i++)
{
    for(int j=0; j < 2; j++)
    {
        res = res + myInts[i][j];
    }
}
cout << "Result is " << res << endl;

// OUTPUT:
// Result is 4
Week 8 Background
File Input/Output
So far in class, we’ve been using the iostream standard library. This library has provided us with methods like cin and cout. cin is the method that reads from standard input (i.e. in the terminal via the keyboard) and cout is for writing to standard output.
In this background section we’ll cover file input, which will allow you to read information from a file and begin creating programs that can be turned off and on while maintaing knowledge of past times it was turned on. To do this, we’ll need to include C++’s fstream library, which is short for “file stream”.
Reading Lines From A File
Step 0. Include the library.
A lot of code is needed in secret to get this to work. Just like we have #include<iostream> to get cin and cout for us
//
#include<fstream>
Step 1. Make a stream object.
Create an object (a variable) of file stream type. If you want to open a file for reading only, then the ifstream object should be used (short for “input file stream”).
// create an `i`nput `f`ile `stream` object
ifstream file_input;
Step 2. Open a file.
Once you have a file stream object, you need to open the file. To do this, use the ifstream object’s open() method (function), which takes only one parameter: the file name as a string (surrounded by “ “ if the file name is given directly).
// open myTextFile.txt with the file stream object
file_input.open("myTextFile.txt");
NOTE: this is a common source of bugs in coding with file streams. The myTextFile.txt file needs to exist in the same directory as the program that you are running. You can access other directories on the computer by learnign more about “file paths”. For now we will not cover it.
Step 3. Checking for open files.
It is always good practice to check if the file has been opened properly and take an appropriate action if not. To check if a file was successfully opened, you may use the fail() or is_open() methods.
fail(): This method will return a boolean value true if the file failed to open and false otherwise.
if (file_input.fail()) // true when file fails to open
{
    cout << "Could not open file." << endl;
     // return to terminate the program
     // EXIT_FAILURE to indicate that the program didn't function as expected
     return EXIT_FAILURE;
}
// do things with the fileis_open(): This method will return a boolean value true if the file has successfully opened and false otherwise.
if (file_input.is_open()) // true when file opens sucessfully
{
    // do things with the file
}
else
{
    cout << "Could not open file." << endl;
}
Step 4. Read lines from the file.
To read a line from the file, you can use getline(file_input, line) which returns true as long as an additional line has been successfully assigned to the variable line. Once no more lines can be read in, getline returns false. So we can set up a while loop where the condition is the call to getline.
string line = "";
int line_idx = 0;
// get the next line from the file and store in 'line' variable
// continue looping as long as there is data to be processed in the file
while ( getline(file_input, line) )
{

    // print each line read from the file
    cout << line_idx << ": " << line << endl;

    // increment index(count of lines in the file)
    line_idx++;
}.eof(): This method will return a boolean value true if all the data in the file was processed and false otherwise.
string line = "";
int line_idx = 0;
// continue looping as long as there is data to be processed in the file
while (!file_input.eof())
{
    // get the next line from the file and store in 'line' variable
    getline(file_input, line);

    // print each line read from the file
    cout << line_idx << ": " << line << endl;

    // increment index(count of lines in the file)
    line_idx++;
}
Step 5. Closing a file.
When you are finished processing your files, it is recommended to close all the opened files before the program is terminated. You can do this by using the .close() function on your file stream object.
// closing the file
file_input.close();
Step 6. Putting it all together.
If we put all the previous steps together, this is the final piece of code we get.
#include<iostream>
#include<fstream>
using namespace std;

int main( )
{
    // create an input file stream object
    ifstream file_input;

    // open myTextFile.txt with the file stream object
    file_input.open( "myTextFile.txt" );

    // check if file opened successfully
    if ( file_input.fail() )
    {
        cout << "Could not open file." << endl;
        return EXIT_FAILURE;
    }

    // since the if returns, we don't need an else...

    // do things with the file
    string line = "";
    int line_idx = 0;

    // read each line from the file
    while ( !file_input.eof() )
    {
        // gets line of text from file_input, stores it in line
        getline( file_input, line );

        // print each line read from the file
        cout << line_idx << ": " << line << endl;

        // increment index (count of lines in the file)
        line_idx++;
    }

    // closing the file
    file_input.close( );
    return 0;
}
RECALL: the open() function requires a correct path to the file. If the myTextFile.txt isn’t there then we will see a print out: Could not open file.
Week 9 Background
File Output
We discussed reading from a file last week. Here, we will show how we can write to a file. First, you define an ofstream variable and open the file you would like to write to. Then you can write to the output file using the same operation you used with cout, <<, and endl.
// Create the output file object
ofstream file_out;
// Opening the output file
file_out.open("output.txt");

// Writing something to the output file
file_out << "writing a sentence to the output file" << endl;

// Writing the value of the variable to the file
string test_string = "you can also write the content of the variable";
file_out << test_string << endl;
file_out.close();
The output.txt will have the following content:
Structs
In C++, we can define a structure using the keyword struct like so:
struct State
{
    string name;
    int area;
};  // <-- semicolon after struct definition
This defines a new type, State, that you can use for declaring variables, e.g.
//create a State variable with no name or area
State emptyState;

//create a State variable with a name and area
State colorado{"Colorado", 104094};
The variables emptyState and colorado both have two named attributes, called members - name and area. We can access each member using dot notation, e.g.
//set members for empty State
emptyState.name = "Texas";
emptyState.area = 268596;

//get members for colorado
cout << colorado.name << " has an area of " << colorado.area << " square miles." << endl;
Expected output:
If we want to compare two structs, we cannot do so directly. Instead, we must compare each data member individually to see if they match, e.g.
//check each data member by one
if(colorado.name == emptyState.name && colorado.area == emptyState.area)
{
    cout << "These are the same state!" << endl;
}
else
{
    cout << "These are not the same state!" << endl;
}
Expected output:
Classes
When writing complex programs, sometimes the built-in data types (such as int, char, string) don’t offer developers enough functionality or flexibility to solve their problems. A solution is for the developer (you - yes, you!) to create your own custom data types to use, called classes. Classes are user-defined data types, which hold their own data members and member functions, which can be accessed and used by creating an instance of that class. A class is like a blueprint for an object, customized for whatever particular problem the programmer is working on.
String, for example, is a class in C++ which holds data (the characters comprising the string) and supports useful member functions like substr which operate on this data.
Below is an example of the basic definition of a class in C++.
class ClassName{
    public:
        //The public interface
        //Member functions

    private:
        //The private data members
}; //must end with a semicolon
Anatomy of a Class
Class Name
A class is defined in C++ using the keyword class followed by the name of the class. The body of the class is defined inside the curly brackets and terminated by a semicolon at the end. This class name will be how you reference any variables or objects you create of that type. For example:
ClassName objectName;
The above line would create a new object (variable) with name objectName and of type ClassName, and this object would have all the properties that you have defined within the class ClassName.
Access Specifiers
Access specifiers in a class are used to set the accessibility of the class members. That is, they restrict access by outside functions to the class members.
Consider the following analogy:
Imagine an intelligence agency like the CIA, that has 10 senior members. Such an organization holds various sorts of information, and needs some way of determining who has access to any given piece of information. Some information concerning classified or dangerous operations may only be accessible to the 10 senior members of the agency, and not directly accessible by any other person. This data would be private.
In a class, like in our intelligence agency, these private data members are only accessible by a class’s member functions and not directly accessible by any object or function outside the class.
Some other information may be available to anyone who wants to know about it. This is public data. Even people outside the CIA can know about it, and the agency might release this information through press releases or other means. In terms of our class, this public data can be accessed by any member function of the class, as well as outside functions and objects, even other classes. The public members of a class can be accessed from anywhere in the program using the direct member access operator (.) with the object of that class.
Data Members and Member Functions
Data members are the data variables and member functions are the functions used to manipulate these variables; together, data members and member functions define the properties and behavior of the objects in a Class.
The data members declared in any class definition can be fundamental data types (like int, char, float, etc.), arrays, or even other classes.
For example, for string objects, the data member is a char array[] that holds all of the individual letters of your string. Some of a string’s member functions that we have used already are functions like .substr() and .length().
Accessing Data Members
Keeping with our intelligence agency example, the code below defines a class that holds information for any general agency. In the main function, we then create a new IntelligenceAgency object called CIA, and we set its organizationName to “CIA” by using the access operator (.) and the corresponding data member’s name. However, we cannot access the classifiedIntelligence data member in the same way. Not everyone has access to that private data.
Instead, we need to use a member function of the IntelligenceAgency class, getClassifiedIntelligence(), in order to see that information. This allows us to control the release of private information by our IntelligenceAgency.
Additionally, the main function includes four different ways of creating objects with descriptions in the comments next to it.
class IntelligenceAgency
{
    public:
        IntelligenceAgency();         // Default constructor
        IntelligenceAgency(string classified_intelligence_input); // Parameterized constructor
        string organizationName;
        string getClassifiedIntelligence();
        void setClassifiedIntelligence(string classifiedIntelligenceInput);

    private:
        string classifiedIntelligence;
};

int main()
{
    IntelligenceAgency CIA;
    CIA.organization_name = "CIA";
    cout << CIA.classifiedIntelligence; // gives an error
    cout << CIA.getClassifiedIntelligence();

    // four types of constructor calls
    IntelligenceAgency abc; // creating an IntelligenceAgency object with the default constructor
    IntelligenceAgency xyz = IntelligenceAgency(); // creating an IntelligenceAgency
    //object with the default constructor
    IntelligenceAgency pqr("PQR"); // creating an IntelligenceAgency
    //object with a paramaterized constructor
    IntelligenceAgency rst = IntelligenceAgency("RST"); // creating an IntelligenceAgency
    //object with a paramaterized constructor
}
Defining Member Functions
You may have noticed that we declared various member functions in our class definition, but we did not specify how they will work when called. The body of the function still needs to be written. The solution is to define a function, such as getClassifiedIntelligence(), corresponding to our class’s functions. But how does our program know that these functions are the same as the ones we declared in our class? You as the developer need to explicitly tell the computer that these functions you are defining are the same ones you declared earlier.
string IntelligenceAgency::getClassifiedIntelligence()
{
    return classifiedIntelligence;
}
void IntelligenceAgency::setClassifiedIntelligence(string classifiedIntelligenceInput)
{
    classifiedIntelligence = classifiedIntelligenceInput;
}
We start the definition as we do any function, with the return type. Then, we have to add a specifier IntelligenceAgency:: that lets our program know that this function and the one we declared inside the class are the same. We can see that this function returns the class’ classifiedIntelligence to the user.
Functions like getClassifiedIntelligence() are called accessor/getter functions. This is because they retrieve or `get’ the private data members of a class object and return it to the program so that these values may be used elsewhere.
The second function, setClassifiedIntelligence(string classifiedIntelligenceInput), is called a mutator/setter function. These allow functions from other parts of our program to modify or ‘set’ the private data members of our class objects. Getters and setters are the functions that our program uses to interact with the private data members of our class objects.
Structs and Classes
A class can have a struct as a data member, much like how a class could have any other type of data member. It’s important to make sure that the class header file (the .h file) can see the definition of the struct. This can be accomplished by defining the struct inside of the .h file, like below:
// filename: example.h
struct State
{
    string name;
    int area;
};                // don't forget the semicolon

class Example
{
    private:
        State my_state_;
        //other data members

    public:
        //setter accepts a State parameter
        void setState(State new_state);

        //getter returns the State member variable
        State getState();

        //other member methods
};
Any file that includes the .h file shown above will be able to use instances of the State struct, so you will not need to define the State struct anywhere else.
When to use Structs vs Classes
While structs and classes are similar, there are some key differences between them. When deciding whether you should use one over the other, consider the functionality you’d like to achieve. A good rule of thumb is to ask whether the data type you’re defining will need to have any methods or private variables. If it will, then you should create a class. If all members can be public and there are no methods, then a struct may be better.
Week 10 Background
This was midterm exam 2, there is no relevant background section.
Week 11 Background
This was Spring Break, there is no relevant background section.
Week 12 Background
If you have not already, please read Week 9’s background section
Header and Source Files
Creating our own classes with various data members and functions increases the complexity of our program. Putting all of the code for our classes as well as the main functionality of our program into one .cpp file can become confusing for you as a programmer, and we need ways of reducing the visual clutter that this creates. This is why, as we increase the complexity of a program, we might need to create multiple files: header and source files, which capture the definition and implementation of the class, respectively.
Header Files
Header files have .h as their filename extensions. In a header file, we declare one or more of the complex structures (classes) we want to develop. In a class, we define member functions and member attributes. These functions and attributes are the building blocks of the class.
// Example File 0: ClassName.h
#include <iostream>
using namespace std;
class ClassName
{
    public:
    .
    .
    .
    private:
    .
    .
    .
};
// Example File 1: IntelligenceAgency.h
#include <iostream>
using namespace std;
class IntelligenceAgency
{
public:
IntelligenceAgency(); // Default constructor
IntelligenceAgency(string classifiedIntelligenceInput); // Parameterized const
string organization_name;
string getClassifiedIntelligence(){return classifiedIntelligence};
void setClassifiedIntelligence(string classifiedIntelligenceInput)
{classifiedIntelligence=classifiedIntelligenceInput};
private:
string classified_intelligence;
};
Source File
Source files are recognizable by the .cpp extension. In a source file, we implement the class defined in the header file. Since we are splitting the development of actual code for the class into a definition (header file) and an implementation (source file), we need to link the two somehow.
//IntelligenceAgency Example
#include "IntelligenceAgency.h"
Or, more generally,
//General Example
#include "ClassName.h"
In the source file, we will include the header file that defines the class so that the source file is “aware” of where we can retrieve the definition of the class. We must define the class definition in every source that wants to use our user defined data type (our class). When implementing each member function, our source files must tell the compiler that these functions are actually the methods defined in our class definition using the syntax that we showed earlier.
How To Compile Multiple Files
Once you create a project with one or more separate classes, it will be necessary to write multiple files (.h and .cpp) and test them before submitting them. You need to compile and execute your code using the command line. Make sure that you start by changing directories so that you are in the folder where your solution’s files are stored. In this example, our folder will be called project2. To change to this directory, use:
cd project2/When compiling from the command line, you need to specify every .cpp file in your project. This means that when you call the g++ compiler, you need to explicitly name the files you’re compiling:
# short
g++ -std=c++17 file1.cpp file2.cpp main.cpp
The compiling command results in the creation of an executable file. Note that header files (.h) are NOT included in compilation commands. If you did not specify a name for this executable, it will be named a.out by default. To execute this file, use the command:
./a.outYou can add the \mintinline{bash}{-o} flag to your compiling command to give the output file a name:
g++ -o myName.out -std=c++17 file1.cpp file2.cpp main.cppAnd then run it with:
./myName.outAt this stage, you may also find it helpful to begin compiling with flags that tell you more information about possible errors in your code. These flags include:
-WallWall is short for “Warn All”, which will turn on most of the warnings in C++. This will help identify various possible ways your code might go wrong, including array bounds errors and other helpful messages.
-WerrorWerror will treat all warnings as errors. This will prevent you from skipping past the possible sources of error in your code, and you will need to make sure all warnings are resolved prior to compiling.
-WpedanticThis flag enables warnings that alert you about language constructs that are not ISO C or ISO C++ standard compliant. This is particularly helpful to identify constructs that may not be uniform in other compilers, which could cause problems with your code on other machines. This will help prevent instances where your code works on your personal computer, but does not work on CodeRunner or on the grader’s computer. All together, your command line prompt will look something like this:
-Wsign-compareThis flag ensures that you don’t have issues across machines and their behavior on looping over a string.
g++ -Wall -Werror -Wpedantic -Wsign-compare -o myName.out -std=c++17 file1.cpp file2.cpp main.cpp
Week 13 Background
This weeks background section explores vectors and randomness. These are important concept for your upcoming project.
Vectors
Let’s start with something we already know about - Arrays.
To recap, an array is a contiguous series that holds a fixed number of values of the same datatype.
A vector is a template class that uses all of the syntax that we used with vanilla arrays, but adds in functionality that relieves us of the burden of keeping track of memory allocation for the arrays. It also introduces a bunch of other features that makes handling arrays much simpler.
First things first. We need to include the appropriate header files to use the vector class.
#include <vector>
We can now move on to declaring a vector. This is general format of any vector declaration:
vector <datatype_here> name(size);
The size field is optional. Vectors are dynamically-sized, so the size that you give them during initialization isn’t permanent - they can be resized as necessary.
You can access elements of a vector in the same way you would access elements in an array, for example array[4]. Remember, indices begin from 0.
The C++ vector class comes with several member functions available in the C++ reference guide, but following are the ones you will need in this week:
size( ) return the size of a vectorat( ) takes an integer parameter for index and returns the value at that position
Adding elements to the vector is done primarily using two functions
push_back() takes in one parameter (the element to be added) and appends it to the end of the vector. Here is an example:
// How to use `push_back()` with vectors:
vector <int> vector1; // initializes an empty vector
vector1.push_back(1); //Adds 1 to the end of the vector.
vector1.push_back(3); //Adds 3 to the end of the vector.
vector1.push_back(4); //Adds 4 to the end of the vector.
cout<< vector1.size(); //This will print the size of the vector - in this case, 3.
// vector1 looks like this: [1, 3, 4]
insert() can add an element at some position in the middle of the vector.
// How to use `insert` with vectors:
// vectorName.insert(vectorName.begin() + position, element)
vector1.insert(vector1.begin() + 1, 2);
cout << vector1.at(1) << endl; // 2 is at index=1
// vector1 looks like this: [1, 2, 3, 4]
Here, the begin function returns an iterator to the first element of the vector. Due to the nature of an iterator, this allows for the utility of using begin() to refer to the first element and begin()+k would refer to the kth element in the vector, starting at 0.
Elements can also be removed.
pop_back() deletes the last element in the vector.
// How to use `pop_back()` with vectors:
vector <int> vector1; // initializes an empty vector
vector1.push_back(1); //Adds 1 to the end of the vector.
vector1.push_back(3); //Adds 3 to the end of the vector.
vector1.push_back(4); //Adds 4 to the end of the vector.
vector1.pop_back(); //Removes the last element of the vector.
//vector1 looks like this: [1, 3]
erase() can delete a single element at some position, which is shown below using the iterator function of begin() to erase the first element of the vector.
// How to use `erase()` with vectors:
// vector_name.erase(vector_name.begin() + position)
vector1.erase(vector1.begin() + 0);
cout << vector1.at(0) << endl; //2 is at index=0
// vector1 looks like this: [2, 3, 4]
It may be useful to think of vectors relationship to arrays as something similar to strings vs arrays of characters; they are similar concepts, but with added utility and flexibility that is helpful. Vectors are also passed by value (like strings) instead of passed by reference (like arrays). This might look something like:
// Full vector example:
void myVecEditFunction(vector <int> vec){
   vec.erase(vec.begin());
   //vec now contains the original vector minus the starting element
}

...

int main(){
   vector <int> originalVector = {1, 2, 3};
   myVecEditFunction(originalVector);
   //originalVector still looks like [1, 2, 3]
}
Randomness
Random numbers are a valuable tool for a number of applications, including writing games where we want random chance to be a factor. There are limitations in being able to make a truly random number generator with code, but we have tools to get close enough.
rand() function is an inbuilt function in C++ STL, which is defined in header file <cstdlib>. rand() is used to generate a series of random numbers. The random number is generated by using an algorithm that gives a series of non-related numbers whenever this function is called. The rand() function is used in C++ to generate random numbers in the range [0, RAND_MAX).
RAND_MAX: It is a constant whose default value may vary between implementations but it is granted to be at least 32767.
The syntax for the function is: int rand(void); where int is the return type and the parameter list is void (i.e. needs to parameters).
However in order to ensure that the random sequence of numbers is unique each time, we must choose a unique starting seed for the random generator.
srand() function is an inbuilt function in C++ STL, which is defined in <cstdlib> header file. srand() is used to initialize random number generators. The srand() function sets the starting point for producing a series of pseudo-random integers. If srand() is not called, the rand() seed is set as if srand(1) were called at the program start. Any other value for seed sets the generator to a different starting point.
Here are the two function prototypes for srand() to see the syntax:
void srand( unsigned seed );
int srand( unsigned int seed);
Seeds the pseudo-random number generator used by rand() with the value seed. Parameter seed: A seed for a new sequence of pseudo-random numbers to be returned by successive calls to rand()
Return value: This function returns a pseudo-generated random number.
Note: The pseudo-random number generator should only be seeded once, before any calls to rand(), and at the start of the program. It should not be repeatedly seeded or reseeded every time you wish to generate a new batch of pseudo-random numbers.
Standard practice is to use the result of a call to srand(time(0)) as the seed. However, time() returns a time_t value which varies every time and hence the pseudo-random number varies for every program call.
Here are a few examples of using randomness.
// A short example to roll a die:
int main( )
{
    //declare variables
    int dieRoll;
    //random seed
    srand(time(0));

    dieRoll = rand()%6; //randomly generate a number 0 through 5
    dieRoll+=1; //add 1 to make it now store a number 1 through 6

    //printing a random number stored in a variable
    cout << "Our dice roll is " << dieRoll << endl;

    //printing the random number directly
    cout << "Our D20 rolled " << rand()%20+1 << endl;
}
// A long example to play Rock, Paper, Scissors:
int main( )
{
//declare variables
char userChoice; //to store the user's choice of R, P or S
int compChoice; //to store the computer's choice
srand(time(0));
//ask the user for their choice
cout << "Rock (R), Paper (P), or Scissors (S)?" << endl;
cin >> userChoice;
compChoice = rand()%3; //randomly choose a number 0, 1 or 2
//Arbitarily choosing that 0 = R, 1 = P, 2 = S for comparison
switch(userChoice){
case 'R':
switch(compChoice){
case 0:
cout << "Both chose rock-- tie!" << endl;
break;
case 1:
cout << "You chose rock, the computer chose ";
cout << "paper -- you lose." << endl;
break;
case 2:
cout << "You chose rock, the computer chose ";
cout << "scissors -- you win!" << endl;
}
break;
case 'P':
switch(compChoice){
case 0:
cout << "You chose paper, the computer chose ";
cout << "rock -- you win!" << endl;
break;
case 1:
cout << "Both chose paper -- tie!" << endl;
break;
case 2:
cout << "You chose paper, the computer chose ";
cout << "scissors -- you lose." << endl;
}
break;
case 'S':
switch(compChoice){
case 0:
cout << "You chose scissors, the computer ";
cout << "chose rock -- you lose." << endl;
break;
case 1:
cout << "You chose scissors, the computer ";
cout << "chose paper -- you win!" << endl;
break;
case 2:
cout << "Both chose scissors -- tie!" << endl;
}
break;
default:
cout << "Invalid choice." << endl;
}
}
Week 14 Background
This was midterm exam 2, there is no relevant background section.
Week 15 Background
Sorting Algorithms
There are several different strategies to sort unordered lists of data. They generally fall into two categories based on how long it takes for them to run proportionate to the number of items they are designed to sort.
When discussing how long an algorithm takes to run, we use something called “Big O Notation”. To use Big O, you need to determine the size of the input, which is designated as n. The number of singular operations to execute your algorithm as a function of the input size defines how long it takes – for example if you have to look at every element in your list only once, you would need n operations. If you had to compare every element to every other element in your list, you would need n^2 (n-squared) operations. Big O then removes any constants or smaller terms, as we are only concerned with the limit of the behavior – i.e., what happens as your input gets exceedingly large.
When using Big-O, the two categories of sorting algorithms become clear: algorithms that generally either require that you compare every element against every other element, meaning they take O(n^2) time, or algorithms that continuously break your data set in halves and compare these smaller pieces, which would take O(n*log(n)) time, as seen in Quick Sort.
Below are four algorithms chosen to represent the different styles of sorting algorithms available to you.
Bubble Sort
Bubble Sort is generally considered the simplest sorting algorithm. It works by repeatedly swapping the adjacent elements if they are in the wrong order, only comparing two at a time.
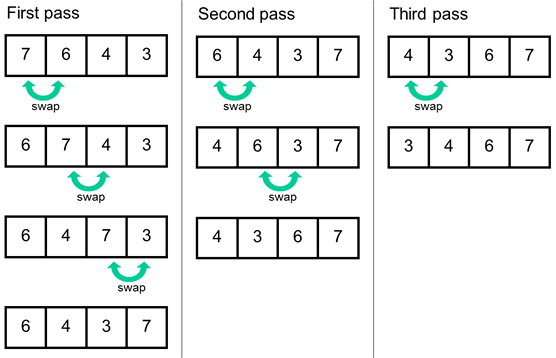
Image Source: https://www.computersciencebytes.com/sorting-algorithms/bubble-sort/
Bubble sort requires comparing n elements against n elements, and so its computational complexity described using Big-O is O(n^2).
Selection Sort
Selection Sort involves picking the smallest (or largest) number out of the unsorted elements and then putting it in its own list, one after the other, so that you find the smallest, then the second smallest, and so on and so forth.
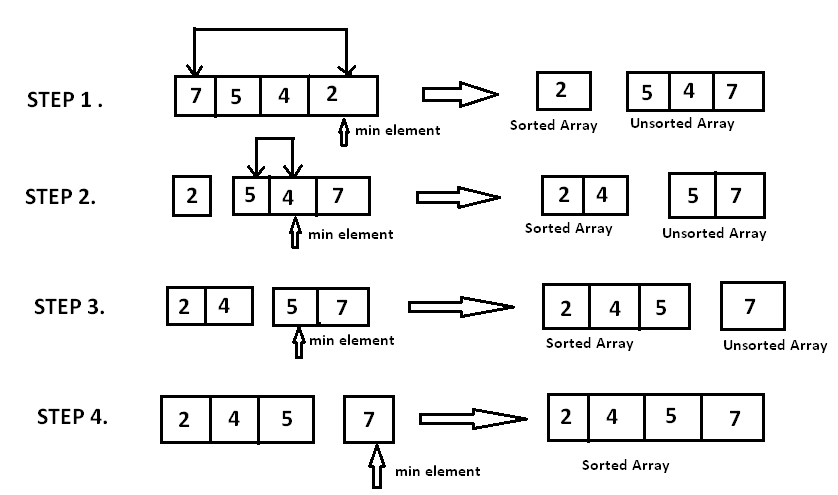
Image Source: https://www.hackerearth.com/practice/algorithms/sorting/selection-sort/tutorial/
For the first level of selection sort, you must search all n elements to find the smallest one. For the second level, you must search n-1 elements, then n-2, and so on and so forth. This will ultimately require n^2/2 operations. We do not worry about constants such as 1/2 in Big-O, and so this is still a computational complexity of O(n^2).
Insertion Sort
Insertion sort works by splitting the list of elements into two pieces: one piece that has already been sorted, and one piece that has not been sorted yet. The algorithm goes through the unsorted list one element at a time and inserts it into the correct position in the sorted list until all elements have been sorted.
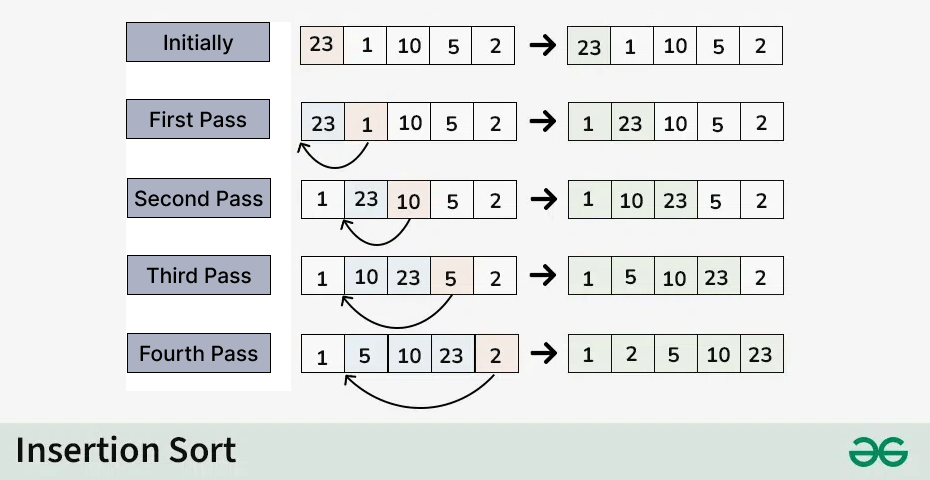
Image Source: https://www.geeksforgeeks.org/insertion-sort-algorithm/
The first element is already considered sorted. For the second element, you must compare against 1 element to decide where to put it; the third requires 2 comparisons; this pattern continues until the last comparison, which would be against n-1 elements. The formula 1+2+...+n-1, when removing constants, also reduces to a Big-O of O(n^2).
Quick Sort
Quick Sort is a little more complex, but it is faster than the previous algorithms, hence the name. Quick sort works by splitting our list around a randomly chosen “pivot” into two smaller lists for us to sort, where one list is smaller than the pivot and the other list is larger than the pivot. We then split those smaller lists around their own pivots again, resulting in four lists. This continues until we run out of elements in our lists.
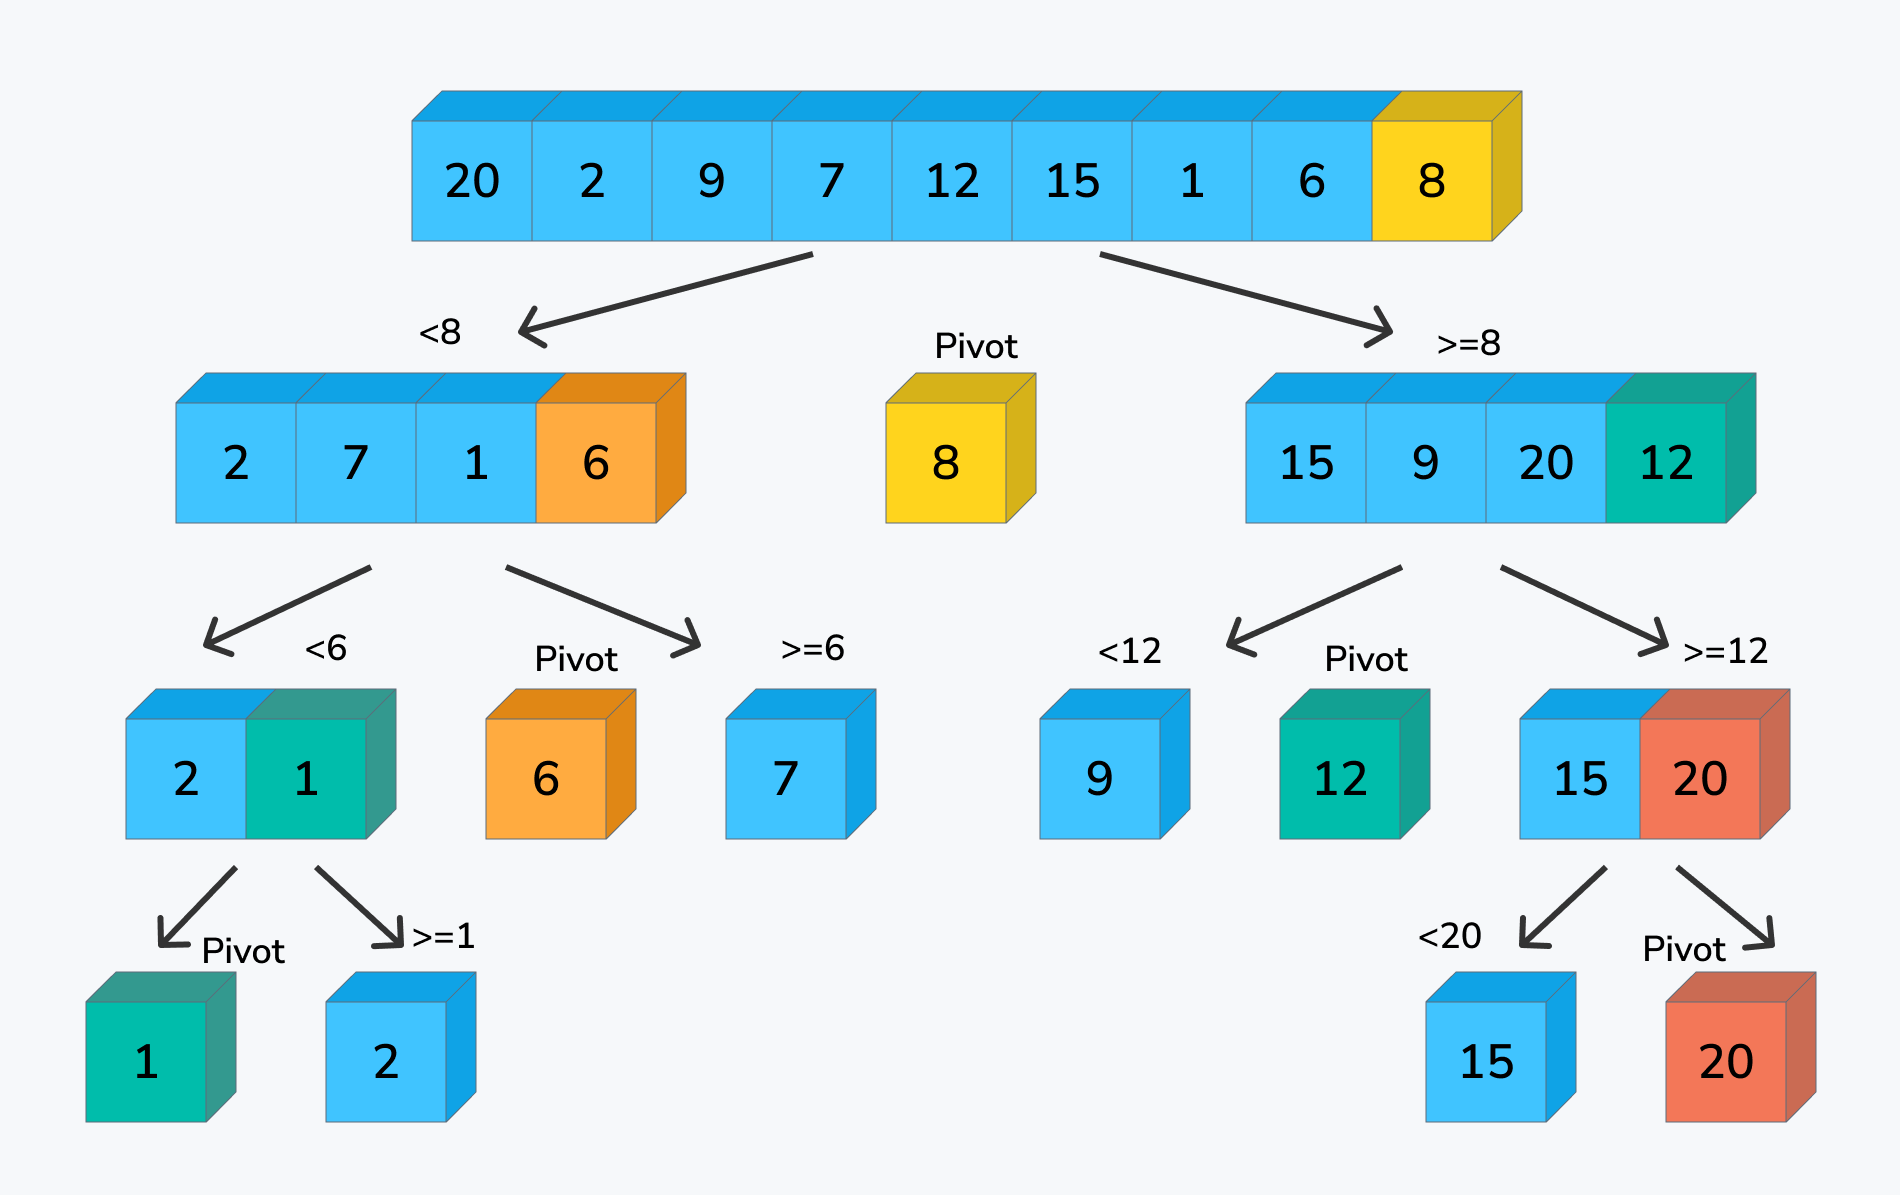
As you can see, this sorting creates a tree-like structure. Each layer contains n elements and requires n operations comparing those elements against their respective pivots. However, the trick that makes this faster than the previous algorithms lies in the number of repetitions for this search: instead of requiring n separate comparisons for each element, as you have seen in the previous three sorting algorithms, you only need as many repetitions as there are layers in this tree. Since each iteration of the tree is splitting the number of elements in half, there are log(n) layers, resulting in a total time complexity of O(n*log(n)).
Recursion
A recursive function is one which calls itself. Recursion can be used to accomplish a repetitive task, like loops. Indeed, it turns out that anything you can do with a loop, you could also do with recursion, and vice versa. However, some algorithms are easier to express with loops, and others are easier to express with recursion. You’ll want both in your toolkit to write elegant, simplistic, short code.
Every recursive function includes two parts:
- base case: A simple non-recursive occurrence that can be solved directly. Sometimes, there are multiple base cases.
- recursive case: A more complex occurrence that can be described using smaller chunks of the problem, closer to the base case.. It is possible to have multiple recursive cases as well.
To write a recursive function, we often use the following format:
returnType functionName(arguments)
{
    if (/* baseCase? */)
    {
        return /* baseCase result */;
    }
    else
    {
        // some calculations, including a call to functionName
        // with “smaller” arguments.
        return /* general result */
    }
}
Consider the following simple recursive function, which calculates the sum of the numbers 1, 2, 3, …, n:
int sumNumsRecursive(int num)
{
    // base case: if the number is 0, we will return 0
    if(num == 0)
    {
        return  0;
    }
    else
    {
        // recursive case: where we try to find the result of the previous step
        return num + sumNumsRecursive(num - 1);
    }
}
The following examples show the final returned value and intermediate recursive function calls.
For example, if num = 3.
- recursive call 1:
sumNumsRecursive(3)will return3 + sumNumsRecursive(2)(we are running the else statement since num is 3). - recursive call 2: When
sumNumsRecursive(2)is called, it will return2 + sumNumsRecursive(1). - recursive call 3: Similarly,
sumNumsRecursive(1)willreturn 1 + sumNumsRecursive(0). - recursive call 4: Finally,
sumNumsRecursive(0)will return 0, by definition of the base case. - Next if we go back the chain and replace
sumNumsRecursive(0)with 0, we will havesumNumsRecursive(1) = 1 + 0. Therefore,sumNumsRecursive(1) = 1. - Similarly,
sumNumsRecursive(2) = 2 + sumNumsRecursive(1), wheresumNumsRecursive(1) = 1. Therefore,sumNumsRecursive(2) = 2 + 1; thus,sumNumsRecursive(2) = 3. - Lastly,
sumNumsRecursive(3) = 3 + 3; the second 3 is the result ofsumNumsRecursive(2). Therefore,sumNumsRecursive(3) = 6.
Below is the same explanation in a different format.
sumNumsRecursive(3) = 3 + sumNumsRecursive(2) // running the else statement
                    = 3 + 2 + sumNumsRecursive(1)
                    // sumNumsRecursive(2) = 2 + sumNumsRecursive(1)
                    = 3 + 2 + 1 + sumNumsRecursive(0)
                    // sumNumsRecursive(1) = 1 + sumNumsRecursive(0)
                    = 3 + 2 + 1 + 0
                    // sumNumsRecursive(0) = 0 (base case)
                    = 6
Recitation Prequiz (N/A)
There is no prequiz this week
Recitation: project presentations
Please attend recitation this week to see presentations of your peers final projects. The presentation is optional for extra credit, but strongly recommended.